Load Balancing using Spring Cloud Netflix Ribbon
Hi, I am Malathi Boggavarapu working at Volvo Group and i live in Gothenburg, Sweden. I have been working on Java since several years and had vast experience and knowledge across various technologies.
This post teaches you about how to acheive Client side LoadBalancing using SpringCloud Netflix Ribbon Api. So let's jump start into the details. First we learn what is meant by LaodBalancing and the differences between Client side and Server side Load Balancing and also we see which one is the best fit for MicroServices.
-Wikipedia
The most important thing you need to know is what role does Load balancing plays in cloud native architecture. It would be very clear if we understand the difference between load balancing in cloud and non-cloud native architecture.
In non-cloud native application, we go from having multiple instances of single application with a single load balancer to Multiple services with multiple instances and multiple load balancers. And you can start to see the importance of load balancer just by the assured number of load balancers that we need in a cloud native application. There are typically two different types of load balancers.
Server side load balancer - Where the server is responsible for distribution of load
Client Side load balancer - Caller is responsible for distribution of load.
Let's take a little more detail about Server side load balancer. The request to the another service does not go directly to the service itself and instead goes to server which then decides which of the multiple instances of the service the request should be forwaded to. With client side load balancing there is no intermediary. The client or caller of service is aware of all the instances of the service via the ServiceDiscovery. The client is then responsible for deciding which of the multiple instances it should send request to.
To solidify understanding of server side and client side load balancing, let's look at each of them below.
- Typically hardware based but it can also be software based.
- You incur an extra hop since the request does not go directly to the service and has to go through intermediary first.
- Support for various load balacing algorithms.
- The actual load balacing happens outside the request process.
- It is centralized or distributed.
- It is software based
- No need to incur extra hop. But want to know the location of services.
- Support for various load balacing algorithms.
Spring Cloud adds full integration with Netflix Ribbon to Spring's RestTemplate class. The RestTemplate will understand how to balance requests across multiple instances of a Service. Spring Cloud also add features that make it really easy to declare different types of load balancing algorithms and availability checks.
It really easy to get started and create a LoadBalanced RestTemplate. Let's create a demo application for Client side load balancing with Spring Cloud.
In this demo, we will setup a Ribbon client that utilies the ServiceDiscovery and balances requests between multiple instances of the Service. Sicne we are using ServiceDiscovery to locate the instances of the Service, we need to have ServiceDiscovery server setup. If you are following along with my previous posts, you should already have had ServiceDiscovery server setup within your IDE. If not, you should grab the project from GitHub account https://github.com/MalathiBoggavarapu/SpringCloud
and import that into the IDE.
Now open up the browser and go to start.spring.io. Fill in with the following data.
Group: com.malathiboggavarapu
Artifact: ribbon-time-service
Dependencies: Web, Eureka Discovery
Now click on Generate Project button to download the ZIP file, Unzip and import that into IDE.
Generate one more project ribbon-time-app at start.spring.io. Choose the dependencies as follows
Group : com.malathiboggavarapu
Artifact: ribbon-time-app
Dependencies: Web, Eureka Discovery, Ribbon
Now click on Generate Project button to download the ZIP file, Unzip and import that into IDE.
We will work on ribbon-time-service application first. Open up the main application class RibbonTimeServiceApplication.java. Add following annotations in the class. See the picture below about RibbonTimeServiceApplication.
- @RestController
- @EnableDiscoveryClient
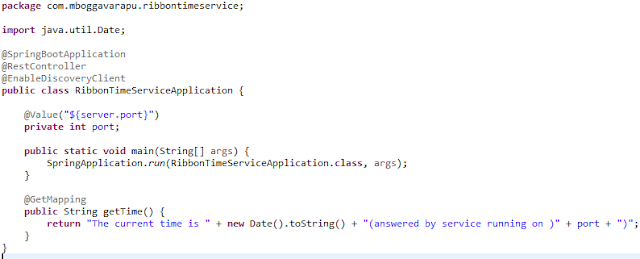
We add a request handler methid getTime and annotate that with @GetMapping. In body of method we return current time. For demonstration purpose we should know which instance is responding to request. And for we use port variable which is annotated with @Value and inject this with server.port variable.
The next step is to update application.properties file. Go ahead and open up the file and add the following properties
spring.application.name=time-service
eureka.client.service-url-defautlZone=http://localhost:8761/eureka
Now everything is setup to start the service ribbon-time-service. Now go to the main application class of ServiceDiscovery server which is called as DiscoveryServerApplication. Right click and select Run As -> Spring Boot App.
Next expand the ribbon-time-service and navigate to the main application class RibbonTimeServiceApplication. Right click and select Run As -> Run Configurations. Since we are starting up two instances of ribbon-time-service, we need to configure two different Run configurations.
So in Run Configurations dialog under Spring Boot App section, click on New configuration button.
Add the details as shown in the below picture

Select the project ribbon-time-service and add the property server.port and set the value to 4444. So the first instance of the service will listen to the port 4444. Click on Apply button and go ahead and create another instance of ribbon-time-service in the similar way as we did now. The second instance will listen to the port 5555. See below for creating second instance.

Click on Apply button. Now Run both the instances of ribbon-time-service. Go to the web browser and test the service by hitting the below urls
http://localhost:4444/
http://localhost:5555/
If you want to see the dashboard of ServiceDiscovery server which is listening at the port 8761, hit the following url
http://localhost:8761
So until now we created multiple instances of the ribbon-time-service application and registered to ServiceDiscovery server. We are now ready to start developing the piece where we use ribbon to load balance between each of the instances of ribbon-time-service.
Now go to the ribbon-time-app and open up the class RibbonTimeAppApplication. Add the following annotations
@RestController
@EnableDiscoveryClient
See the below picture for complete configuration of the class.

We inject a RestTemplate and we are creating a method which return the new RestTemplate as a LoadBalanced RestTemplate.
We need one more method for request handling called getTime(). In the body of the method we use RestTemplate to call ribbon-time-service application and return the result as String.
Now start up the ribbon-time-app application by right clicking on RibbonTimeAppApplication and select Spring Boot App. After the application is started, go ahead to the browser and hit the url
http://localhost:8080.
Everytime you hit the url, client side load balancer balance the request handling among two instances of ribbon-time-service application and return the response. Just try it, you understand.

This post teaches you about how to acheive Client side LoadBalancing using SpringCloud Netflix Ribbon Api. So let's jump start into the details. First we learn what is meant by LaodBalancing and the differences between Client side and Server side Load Balancing and also we see which one is the best fit for MicroServices.
What is Load Balancing
Simply put, Load balancing is a way to improve distribution of work load across multiple computing resources-Wikipedia
The most important thing you need to know is what role does Load balancing plays in cloud native architecture. It would be very clear if we understand the difference between load balancing in cloud and non-cloud native architecture.
In non-cloud native application, we go from having multiple instances of single application with a single load balancer to Multiple services with multiple instances and multiple load balancers. And you can start to see the importance of load balancer just by the assured number of load balancers that we need in a cloud native application. There are typically two different types of load balancers.
Server side load balancer - Where the server is responsible for distribution of load
Client Side load balancer - Caller is responsible for distribution of load.
Let's take a little more detail about Server side load balancer. The request to the another service does not go directly to the service itself and instead goes to server which then decides which of the multiple instances of the service the request should be forwaded to. With client side load balancing there is no intermediary. The client or caller of service is aware of all the instances of the service via the ServiceDiscovery. The client is then responsible for deciding which of the multiple instances it should send request to.
To solidify understanding of server side and client side load balancing, let's look at each of them below.
Server side load balancing
- Server distributes the request- Typically hardware based but it can also be software based.
- You incur an extra hop since the request does not go directly to the service and has to go through intermediary first.
- Support for various load balacing algorithms.
- The actual load balacing happens outside the request process.
- It is centralized or distributed.
Client side load balancing
- Client distributes the request- It is software based
- No need to incur extra hop. But want to know the location of services.
- Support for various load balacing algorithms.
- The actual load balancing occurs within the request process
- Typically distributed.
Given all of these differences between Server side and Client side load balancing, Client side load balancing is the best fit for Cloud native application.
Client side Load balancing with Spring Cloud
We use a library called Netflix Ribbon to implement Client side load balancing. It is an inter-process comunication library with built-in software load balancers.Spring Cloud adds full integration with Netflix Ribbon to Spring's RestTemplate class. The RestTemplate will understand how to balance requests across multiple instances of a Service. Spring Cloud also add features that make it really easy to declare different types of load balancing algorithms and availability checks.
It really easy to get started and create a LoadBalanced RestTemplate. Let's create a demo application for Client side load balancing with Spring Cloud.
Demo: Load balancing Using Ribbon with Service Discovery
In this demo, we will setup a Ribbon client that utilies the ServiceDiscovery and balances requests between multiple instances of the Service. Sicne we are using ServiceDiscovery to locate the instances of the Service, we need to have ServiceDiscovery server setup. If you are following along with my previous posts, you should already have had ServiceDiscovery server setup within your IDE. If not, you should grab the project from GitHub account https://github.com/MalathiBoggavarapu/SpringCloud
and import that into the IDE.
Now open up the browser and go to start.spring.io. Fill in with the following data.
Group: com.malathiboggavarapu
Artifact: ribbon-time-service
Dependencies: Web, Eureka Discovery
Now click on Generate Project button to download the ZIP file, Unzip and import that into IDE.
Generate one more project ribbon-time-app at start.spring.io. Choose the dependencies as follows
Group : com.malathiboggavarapu
Artifact: ribbon-time-app
Dependencies: Web, Eureka Discovery, Ribbon
Now click on Generate Project button to download the ZIP file, Unzip and import that into IDE.
We will work on ribbon-time-service application first. Open up the main application class RibbonTimeServiceApplication.java. Add following annotations in the class. See the picture below about RibbonTimeServiceApplication.
- @RestController
- @EnableDiscoveryClient

We add a request handler methid getTime and annotate that with @GetMapping. In body of method we return current time. For demonstration purpose we should know which instance is responding to request. And for we use port variable which is annotated with @Value and inject this with server.port variable.
The next step is to update application.properties file. Go ahead and open up the file and add the following properties
spring.application.name=time-service
eureka.client.service-url-defautlZone=http://localhost:8761/eureka
Now everything is setup to start the service ribbon-time-service. Now go to the main application class of ServiceDiscovery server which is called as DiscoveryServerApplication. Right click and select Run As -> Spring Boot App.
Next expand the ribbon-time-service and navigate to the main application class RibbonTimeServiceApplication. Right click and select Run As -> Run Configurations. Since we are starting up two instances of ribbon-time-service, we need to configure two different Run configurations.
So in Run Configurations dialog under Spring Boot App section, click on New configuration button.
Add the details as shown in the below picture

Select the project ribbon-time-service and add the property server.port and set the value to 4444. So the first instance of the service will listen to the port 4444. Click on Apply button and go ahead and create another instance of ribbon-time-service in the similar way as we did now. The second instance will listen to the port 5555. See below for creating second instance.

Click on Apply button. Now Run both the instances of ribbon-time-service. Go to the web browser and test the service by hitting the below urls
http://localhost:4444/
http://localhost:5555/
If you want to see the dashboard of ServiceDiscovery server which is listening at the port 8761, hit the following url
http://localhost:8761
So until now we created multiple instances of the ribbon-time-service application and registered to ServiceDiscovery server. We are now ready to start developing the piece where we use ribbon to load balance between each of the instances of ribbon-time-service.
Now go to the ribbon-time-app and open up the class RibbonTimeAppApplication. Add the following annotations
@RestController
@EnableDiscoveryClient
See the below picture for complete configuration of the class.

We need one more method for request handling called getTime(). In the body of the method we use RestTemplate to call ribbon-time-service application and return the result as String.
Now start up the ribbon-time-app application by right clicking on RibbonTimeAppApplication and select Spring Boot App. After the application is started, go ahead to the browser and hit the url
http://localhost:8080.
Everytime you hit the url, client side load balancer balance the request handling among two instances of ribbon-time-service application and return the response. Just try it, you understand.
Demo: Load balancing Using Ribbon without Service Discovery
Now let's take a look at other annotation @RibbonClient annotation. In this demo we see how we use this annotation along with @LoadBalanced annotation to acheive client side load balancing with out ServiceDiscovery.
Open up the main application class RibbonTimeServiceApplication of ribbon-time-service application (which is explained above). Remove the @EnabledDiscoveryClient annotation. Now open application.properties and delete the property that sets the location of ServiceDiscovery server.
Once everything is setup, we are ready to start the ribbon-time-service application without ServiceDiscovery server. Start each of the instances of ribbon-time-service application. Just to make sure that out ribbon-time-service instances are started up correctly, do a quick check. Hit the following urls in the browser.
http://localhost:4444
http://localhost:5555
They should return the response.
Next go to ribbon-time-app and open up the main application class RibbonTimeAppApplication. Just like we did for ribbon-time-service, we remove the annotation @EnableDiscoveryClient and add new annotation @RibbonClient. See the below picture.

As you see above, we set the name element to time-service String. This is the same time-service that we used when we were using ServiceDiscovery server. We used it in pretty much similar fashion. We refered to it in a RestTemplate url as logical service identifer and then configure what those particular instances are that represent that service within configuration. Now open up application.properties and add the following properties.
We prefix all of the properties that were setting up to configure our RibbonClient with the name of the RibbonClient. In our case we use time-service so we say
time-service.ribbon.eureka.enabled=false // This tells not to use ServiceDiscovery
time-service.ribbon.listOfServers=http://localhost:4444, http://localhost:5555
So that's all the confiuration we need to setup without using ServiceDiscovery server. Now go to the main application class RibbonTimeAppApplication and run as SpringBootApp.
Now hit the url http://localhost:8080. Now you get a response from different instances at each time you refresh the page. Just try it out and verify.
We came to an end of the post. Hope it is helpful! Please post your comments below.
Happy learning!

Comments
Post a Comment