Creating your First Spring Boot Application
Hi, I am Malathi Boggavarapu working at Volvo Group and i live in Gothenburg, Sweden. I have been working on Java since several years and had vast experience and knowledge across various technologies.
In this post we will see how to create first Spring Boot application
Introduction
Spring Boot is fairly large topic when combined with Spring. So this course will cover the fundamentals of working with Spring Boot while creating the application. This course is geared towards the beginner or intermediate Spring developer and i will introduce Spring Boot in that context, giving you the understanding of what it is, how to use it and cover the fundamentals and architectiure of the framework. This platform is the game changer of java applications. So we will go ahead and get started immediatly by creating a Spring Boot application from scratch.Prerequisites
Java 1.8+Maven
IDE (Spring STS, Eclipse)
The Spring STS - Spring Tool Suite is an Eclipse-based development environment that is customized for developing Spring applications. It provides a ready-to-use environment to implement, debug, run, and deploy your Spring applications, including integrations for Pivotal tc Server, Pivotal Cloud Foundry, Git, Maven, AspectJ, and more.
You can find download link of Spring STS at https://spring.io/tools
First thing i want to do is to create a new blank Maven project using IDE. Simply click on New -> Maven Project. Under archetype section, chose the default maven archetype 'maven-archetype-quickstart' as shown below and click Next.

Next add groupId, ArtifactId and package and click Finish.
A new project will be created that shows in the Project Explorer. Now we have basic project structure and now we look into the pom.xml that is created automatically. We have groupId, artifactId, version and packaging defined. Now what we need to do is add the Spring Boot dependencies. Normally we add dependencies one by one to dependencies block in maven. But for Spring Boot we are going to add as parent to our project. See the picture below. You can use any latest version of spring Boot. I am using 1.3.1.RELEASE.

Now we have Spring Boot parent in place. We can then pick and choose what parts of Spring framework we want to integrate in our Spring Boot application. Start by including spring-boot-starter-web dependency. See below for Spring web dependency.

Now this Spring Boot starter web dependency is going to integrate spring MVC and auto-configure for us.
Next we look at the "App.java" class that the Maven quick start archetype created for us. This should be located at the com.boot package. See the below picture of App.java class.
Note: com.boot is the package that i specified while i was creating new Maven project as shown above.

We see that this is a public static void main class. I know many java web developers haven't seen java main class in a long time and that's because we have been running most of the applications with containers. And in Spring boot we are going to run as regular java plain program. So to enable Spring Boot we need to add an annotation called "@SpringBootApplication" to the top of this class. Do Ctrl+Shift+O to import the packages that should be added by the annotation. This annotation scans our project for Spring components and auto-wires up most of the spring libraries we want to use by enabling auto-configuration.
Next we need to adjust the default contents of our main method. By default Maven archetype creates println statements with "Hello World as content". So instead of printing Hello World i am going to replace with the code which is illustrated in the above picture.
SpringApplication.run(App.class, args);
This SpringApplication is a new class which fires up Spring Boot when main method is run as a pure java application. Next we need to add Spring MVC controller which will handle root or home url call on our Spring boot web application. Before moving to to that lets create some packages just to keep our application clean and group related code. We create controller, model, repository and service packages which will clearly separate all our architectural pieces that we will be working through out this course.
So first we create a controller called "HomeController". We will make it as Spring MVC controller by adding @RestController annotation. Later add a method and annotate it with RequestMapping annotation. Here the forward slash - "/" is to identify which mapping it will take.

Until now we simply added pom.xml, App.java and a HomeController. All we need to do is to start the application. Normally we do that using the containers such as Tomcat but what i am going to do now is go to App.java class and right click on it and chose 'Run as java application'.
So now go to the browser and navigate to the application using the url "http://localhost:8080/"
If you notice the output, it prints whatever String is defined inside the home method of HomeController. See the below picture.

Spring Boot dependency management
Spring Boot makes life easier when we want to integrate different libraries and frameworks in your application due to its dependency management structure. Spring boot causes intelligent collection of dependencies "The bill of materials" or BOM. The spring developers have taken the time to match up all the frameworks that you may want to include in your application with appropriate versions that work well with each other. For example if you are working with Spring version 4.2.3, you would want to use 1.3.3 of the logback-core since those two frameworks and their versions have a known working relationship. By using Spring Boot bill of materials, all these "version matches" have been setup already for you. If you ever started pointing dependencies manually by including them in your build one by one, you may have to run into situation where you have to spend spare amount of time trying to find the right version of libraries that work well with each other. So how does the Spring Boot "BOM" actually work?When we add a Spring-boot-starter-parent to Maven build file, that parent brought in all of the dependency management. The starter parent also setup other defaults that are useful for your project such as plugins, the java minimum support version, resource filtering and so on. This simple parent decoration is really doing lot of the projects heavy lifting.
If we look into our pom.xml file, we have added a dependency spring-boot-starter-web. Now we will see how BOM works by looking into the dependency hierarchy of pom.xml.

you can see the version of spring-boot-starter-web is set to 1.3.1.RELEASE and all of its transitive dependencies such as spring-boot and spring-core are set to their appropriate versions as well. If you go back to plain pom.xml file, you can see that no version is defined for spring-boot-starter-web dependency. Normally the version is required but in this case we don't need to supply because the spring-boot-starter-parent defines its dependency and its versions for us and also sets up correct associated dependencies and their versions.
You can see how Spring parent BOM works by changing the version from 1.3.1 to older version. Change the version to 1.2.7 and check the dependency hierarchy now. You now notice that spring-boot-starter-web is now changed to 1.2.7. Versions are also changed in transitive dependencies. See the below picture

So Spring boot handles all the intricacies of the dependency versions just by specifying one single parent version in your build. It may not sound like a big deal but trust me you never had to define all your dependencies one by one in your pom file. It is very tedious to do such way. Example we no need to search and find which version of Spring mvc matches with spring core version. Spring Boot automatically sets that for us.
Other Spring Boot initializers
Even though rolling your own Spring boot project isn't that hard, Spring provides few other tools that make getting started Spring Boot even easier. Spring initializer website http://start.spring.io is the first tool which makes easy to generate a new project and select a bunch of options to setup and running really quick. Please visit the website and try it once.If you are kind of developer who enjoys working in a command line, you may want to consider installing Spring boot command line interface or CLI. I am not going to discuss more about it now.
The last way to get an app and run it quickly, you can simply clone the copy of spring boot example projects that spring provides on github repo. Once you clone the app all you need to do is to start replacing the existing code samples with business logic for your project.
The url for spring boot example projects on github is below.
https://github.com/spring-projects/spring-boot/tree/master/spring-boot-samples
How does Spring Boot works
When we created our initial application, we didn't deploy the application to a container like Tomcat, we simply started java main method to run our app.
Let's discuss the steps illustrated in the above picture.
First application is started from a java main class using standard main method. Nothing was too surprising here because this is how every java application starts up since the dawn of java.
Spring boot initializes the spring context that comprises your spring application and then honors any auto-config initializers, configuration and annotations that direct how to initialize and startup the Spring context.
Last an embedded server container is started and auto-configured. This is done under the covers and removes the need for web.xml. Spring has chosen Tomcat as default server container but there are options to swap out with jetty or change configuration options such as the server port.
Now we will discuss the points related to the actual code

The main annotation that we place on App.java class is SpringBootApplication annotation. This directs Spring boot how to initialize and startup Spring. This annotation actually sets up other annotations under the covers. So instead of writing out each of the annotations you can use this one as convenient annotation.
@configuration
@EnableAutoConfiguration
@ComponentScan
These are the annotations that SpringBootApplication annotation provides. Configuration annotation classifies this java class as a configuration for spring context that spring boot and spring will used to initialize and configure various components and environment settings used by spring. You can think about configuration annotation as a covenant to the older spring xml based configurations. So instead of using xml to define spring components, we are going to use java to define them. This is the standard spring concept and is not limited to Spring Boot applications anymore.
EnableAutoConfiguration is a spring boot specific annotation. This annotation tells spring boot that if it finds any spring sub projects or other spring compatible frameworks on the classpath, then it should attempt to auto-configure them and get them wired up and integrate automatically with spring.
This single annotation does a lot of magic of spring boot when combined with Maven BOM that spring boot starter parent provides. When we added spring-boot-starter-web dependency in our pom.xml file, that brought in the spring mvc sub framework.This auto configuration annotation told spring boot to automatically set that up so we can use spring controllers without having to do any other integration work with that framework. This conceptual feature of spring boot is really one of the best reasons you should be using Spring boot. It makes setting up a full java stack app so easy.
The last annotation is ComponentScan. This annotation tells spring boot and spring to look for any spring components such as controllers, services, repositories or any other spring components starting in the package of App.java and recursively looking through all sub-packages from there. So make a note that if you place main App class in a nested sub-folder, the ComponentScan wont be able to find the Spring components. It is best to keep main class at the top level of the main package structure.
And finally SpringApplication boot class is placed in the main method and the static run method is called. This code initializes spring context, applies all the annotations and configuration classes, searches for any spring components and places them in the spring context. It finally sets up and configures the embedded container.
Why move to Containerless deployments

So why would you want to lose container deployments and simply running application as a plain java program? So let's take a look at what happens when we deploy to a container such as tomcat or jboss.
First the container needs to be setup and configured for each environment. So if you have production, stage, test and dev environment, the container needs to be setup and configured for each of these environments. This process is independent of your actual application and is much like provisioning database for each of these environments.
Next for your app to work, you need to provide some deployment descriptors so the container understands how to deploy and serve up your application. It is typically done by web.xml file so that the server container knows how to setup the application, so it can be accessed via the http protocol.
Any application environment configuration needs to be setup and agreed upon by the application and the container. Lots of time, this means using jndi or container environment properties or settings. This kind of environmental configuration is external to your application and is configured in the container.
Now let us see what happens when container is embedded inside the application. When application is ready to deployment you only need to find the environment that is capable of running the correct version of java that your application runs on. This removes any pre-container setup steps and many cloud environments can easily run java so deploying to these environments is now quite simple since you can just store your application jar file and then it starts running. You don't want a hosting environment such as Jboss, Tomcat or any other containers out there.
Now that the container is embedded inside the application, we don't need any deployment descriptor. The web.xml is gone now. The application along with spring boot direct the embedded server container, how to setup the app so that it can be accessed via the http protocol.
All the environmental configuration is now bundled and handled with your application. Being able to run your application as a plain java app provides some other benefits such as easier debugging and testing which we will discuss later.
And for some reason if you can't get away from deploying to container, you can still deploy spring boot apps to a container.
Creating webapps
Now we will see how to setup Spring MVC to handle communicating with our web client via our REST api. Spring boot auto-configures Spring MVC for us, so we will take a look at how to create controllers, configure Spring MVC with Spring boot application properties and learn where to put web related resources like html, CSS and javascript so Spring boot embedded container can properly serve the web resources upto a browser.Make sure the Spring boot application we made in first section of this course is working and running before continuing on because we are going to do lot of coding and learning in this section.
RESTful webapp
We now concentrate on creating web application which consists of frontend and backend. Frontend can be written using many frontend technologies. I dont want to discuss more about the frontend in detail in this section but i just want to show where we need to add web related resources like html, css in the project.

As you can see we have some html files inside the folder src/main/resources/public. This is the default folder where we can place all the resources such as html, CSS and so on. So now when we try to access the url
http://localhost:8080/index.html
Spring Boot application will access the index.html file and display it for the user in the browser.
Now let me discuss about how we create REST endpoint urls inorder to allow the frontend to access them.
If you see the above picture, we created a new controller called ShipwreckController. We mark the controller class with @RestController annotation and added one more class level annotation @RequestMapping with uri api/v1.
We also have method level annotation @RequestMapping which takes value and method as parameters. method will represent GET, POST basically.
Example:
A frontend request http://localhost:8080/api/v1/shipwreks will be mapped to the ShipwreckController class to the method list(). shipwreks will be mapped at method level, so the list() method will be called.
We can also add many methods with different method level RequestMapping urls. See the below picture for clear view. Each of these methods handles CRUD operations for shipwreck resource in our application. We can add a shipwreck with a POST, view a shipwreck, update a shipwreck and finally delete a shipwreck. All these methods in code in this controller is Spring MVC code. There is nothing that Spring Boot is doing here. The part that Spring boot is actually doing is that you can't see in the code. Spring boot is handling the integration of Spring MVC and then its sets up the Jackson JSON library so that when we send the shipwreck info across the http connection, Spring boot and Spring MVC will automatically marshall the JSON info into and out of the shipwreck java object.
Spring Boot made integrating Spring MVC very easy and left developers to simply code the application logic.
Please note:
Shipwreck is the java object that holds some properties and getters and setters.ShipwreckStub is the java class which holds some dummy data. We are not actually using any database here but instead using ShipwreckStub. We will see in later on sections how we setup and configure databases in our Spring Boot application. After we do that, we are going to replace ShipwreckStub in the below code.

Properties and Environmental configuration
In this section we will see how easy it is to modify Spring boot default behaviour by utilising the application.properties file. The first thing to do is to create application.properties file and add it to the correct place on the classpath so that Spring boot can find it. We then modify some of the embedded container properties to see how adding simple properties effects the application behaviour. We also set up some profile specific application property files so you can see how using Spring profiles can run your application differently based on the environment that you are deploying and running in.Now lets add applicaiton.properties file to the application classpath. We add it to the root of src/main/resources. As we all know src/main/resources is the default classpath that Maven sets up for us.
Spring auto-configurators allow a ton of application behaviours to be configured with simple properties. So we go ahead and look at couple of properties so you can see how they work. There are so many properties that configures spring boot app but we are not going to cover all of them.

We can adjust the logging level of the application using the logging.level.org.springframwork.web. what we are doing is we are setting the logging level of the package org.springframwork.web to DEBUG so we can see more info about the framework.
You can place any of the package strutures you want for logging levels. We can also add logging levels of hibernate and some other frameworks just to see how they work.
Just start the application and look at the console, you will see lot of logging information about spring framwork about request mapping urls and so on.
You can also customize the server port that is used by the embedded server container. Until this point we are using port 8080 which is the default for spring boot framework. But based on the environment, we may want to change to something different. So the property for that is called server.port. Try changing the property value from 8080 to 8181.
Go ahead and restart the application and now try accessing the application at port 8080. It does not work because we customized the port number in application.properties. Now if you try accessing the application at port 8181, it works. Just try it!!
We may however have different port needs based on environment we may want to run our app. Just go ahead and add couple of environemnt specific property files so we can customize each env appropriatly.
So back to my src/main/resources folder, we add two properties application-test.properties and application-prod.properties. These are environment or profile specific files because of the hyphen (-) profile names test and prod.
application-test.properties
server.port = 9090
application-prod.properties
server.port = 80
So while we are working with spring profiles, Spring boot first loads all of the application.properties and then override any of the enviroment specific properties as needed. So in this case server.port will be overriden if we are changing to prod or test profile but it will also pick up the loggin level form our default application.properties file.
If you are running from IDE, we need to specify -D property that defines the profile. See the picture below. Spring profiles are part of the Core spring project and they are not spring boot specific. So you may have used these if you used Spring before.

Go ahead and run the application and see. One indication that it is using the profile test is to check the port the application is running at. You should see the port number as 9090 as defined in the application-test.properties file.
The Spring boot documentation has the list of all the properties at this url
https://docs.spring.io/spring-boot/docs/current/reference/html/common-application-properties.html
Since this url may change over time, i recommend searching for Spring boot common application properties in google and it should be able to find the information.
Configuring and Accessing a Data Source
Before we can figure out what spring boot starters we need to integrate into your application to get persistance tier to store shipwrecks, we need to understand architecturally how our application is layered out.
Since we are talking about persistance we are going to talk about server side of our spring boot app. We currently have REST api setup with controllers using spring mvc framework. This sits at the top of the server side stack. Next we need to tie JPA and Spring Data JPA, so spring MVC controllers have persistance layer they can utilize. The JPA ORM layer then talk with the database. I am going to use embeddable H2 database in this project so that it is easy to provision and use but this could easily be a mysql or oracle or some other kind of relational db. Another piece that is a good idea to incorporate into your project is ability to version and migrate your database structure along with ur code. Here i am using Flyway DB framework to handle that.
Now the frameworks have been identified, we have to plugin the redish, orange pieces of this diagram so we can understand what needs to be integrated with Spring boot starters.
All we need to do is add the spring data jpa starters and Spring boot will auto-configure and setup Spring data jpa with jpa and all its related libraries pulled in and setup. The H2 database and FlywayDB libraries are simply dependencies in our maven pom file. Even H2 and flyway are not actually the starters, Spring boot and Spring will still integrate them and allow us to configure most of the frameworks via the application.properties.
Now we are going to integrate H2 database. That mainly involves adding H2 dependency to the pom file. This will include the actual H2 embeddable database and jdbc driver support for it.

If we see the above picture, we added spring boot data jpa starter and dependency for H2 database. Now we look into the Dependency Hierarchy tab of our pom.xml to see how spring boot automatically configure some of the transitive dependecies by adding just those two dependecnies to pom.xml file.

In above picture you can see all the dependencies that this starter included like hibernate, jdbc, jpa and so on. Because of spring boot BOM and dependency starter magic, a lot of integration effort is obtained for free by simply adding this one dependency in our pom file.
Now we add some of properties regarding H2 database to application.properties.
spring.h2.console.enabled=true
spring.h2.console.path=/h2
These properties enable h2 database console in your webapp and allow us to sprcify the path to access it. In this case it is /h2. If we access http://localhost:8080/h2 from the browser it shows in the below way

Click on connect button and check. since we dont have any database tables created, now we will see how we setup the database structure in our application. In real world applications, we never use in-memory database like H2. We prefer to use databases such as Mysql, Oracle and so on. In that case the database will probably located in different server and we need to provide jdbc database connection details. In Spring boot we can configure data source with the application.properties file.
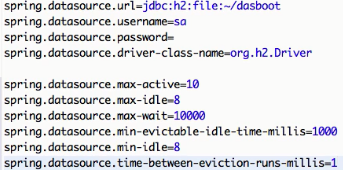
Now we will see how to configure the database for our application by adding properties to application.properties file.

In above picture, we added the properties for configuring H2 database by spring boot application. Instead of using in-memory H2 database , we are saving the database to a file. In our case, we are saving to dasboot file. And we also added login information and jdbc driver class to the properties file.
Back to the pom.xml, i want to talk little bit about the database pooling in our application. The spring-boot-starter-data-jpa dependency that we have added also includes the tomcat jdbc pooling. You can check that in Dependency Hierarchy tab and search for tomcat-jdbc. See the below picture

The main dependency is the spring-boot-starter-data-jpa which also includes spring-boot-starter-jdbc which automatically included tomcat-jdbc database pool library. Since the library lives on classpath, it's been used as database pool. So we can actually go and configure that in application.properties. See below.
We can configure them according to the environment because it is obvious that these settings can change from dev to production environment.
Integrating FlywayDB in your application
Add Flyway dependency to the pom.xml.
<dependency>
<groupId>org.flywaydb</groupId>
<artifactId>flyway-core</artifactId>
</dependency>
Next we need to add migration scripts to the classpath. Create some folders that are specific to the database migration scripts. We create db -> migration ->V2__create_ shipwrecks.sql under src/main/resources folder. See the below sql file that creates a table SHIPWRECK.

At this point Flyway is pretty much integrated and there is migration script that can be run on application startup to create our shipwreck table. Spring boot is going to configure Flyway with datasource that was setup already by us.
Before starting the application, we need to add a property to application.properties so that Flyway initializes properly. Add a new property called flyway.baseline-on-migrate=true. This property will tell flyway to install and setup correctly. We are going to add one more property spring.jpa.hibernate-ddl=false. Because hibernate is running as EntityManager for our JPA, it will try to auto-create any entities using the ddl of those entities. So to shut that feature OFF, i am adding this property. So now we are only relying on Flyway for creating database structures and NOT hibernate.
Restart the application and login to the database and see whether database table has been created.
If you are interested to see other auto configuration properties that you want to setup for Flyway, you check out the Spring boot documentation.
Spring Boot Java Configuration
Even though we can do lot of configuration with Spring boot properties in application.properties, you may find a need to do some configuration for your application that falls outside the configuration options. In older versions of Spring, most of the configuration was handled by the xml files. You can accomplish the same configuration using java code. This removes the xml from application and allows us to programatically handle any kind of app configuration needs that need to take place on app startup.

Instead of relying on the auto-configuration to setup and build the app dataSource, i can create a configuration class and create a dataSource programatically. Any configuration java class that has public methods with @Bean annotation will get loaded on app startup and return values of these methods will then be setup as beans inside of the spring context. This basic configuration pattern lets you add or configure any bean to the spring context.
Defining Multiple Datasources
We are going to do some java configuration in our application.

We need to add an annotation @Configuration at class level to tell Spring boot that this is a Configuration class. The @Bean annotation tells Spring boot that the return value of the method which is a DataSource needs to be setup and stored as a Spring bean in the Spring context. The ConfigurationProperties annotation tells the DataSourceBuilder to use the connection and pooling properties located in application.properties file where the properties begin with spring.datasource prefix. I can keep all the existing connecting property definitions that were used by auto-configuration setup and the Spring dataSource bean will re-use those.
Since i am going to add another dataSource to my application, Spring needs to know which one is the default dataSource that should be used if not defined. We can specify it by using @Primary annotation. Now Spring Boot will use as primary or default datasource if there is ever any ambuguity when wiring up the dataSource in the application.
Now we add one more dataSource method called flywayDataSource which have ConfigurationProerpties set with prefix datasource.flyway. As we have not yet defined dataSource with such prefix in application.properties, we are going to do it now. See below. Flyway recognizes the flyway dataSource setup using the annotation @FlywayDataSource

Since i just want to illustrate how to use multiple databases, i am not bothering much about using different databases. Just to illustrate the usage of defining multiple dataSources in application, i am using the same credentials and driver path to h2 database as the main dataSource defined in the application.properties (See above).
Adding JPA and Spring Data JPA
Annotate the Shipwreck.java class with JPA annotations as shown below. We add @Entity at class level and @Id and @GeneratedValue annotations to field id.

Next we are going to create a new interface called ShipwreckRepository. This class extends JpaRepository and takes Shiwreck and Long as arguments. See below.

Completing the app
Now let's go and modify our ShipwreckController. Earlier we used ShipwreckStub which deals with only dummy data. Now when we wire up ShipwreckRepository in ShipwreckController class, we actually interact with H2 database and do CRUD operations on the Shipwreck entity.

In the above code, we autowire ShipwreckRepository in ShipwreckController class. shipwreckRepository is used to make database calls and do CRUD operations on Shipwreck entity.
The first method list() is modified to shipwreckRepository.findAll() where findAll method fetches all the shipwreck entities from the database and returns them.
shipwreckRepository.saveAndFlush is used to save the entity Shipwreck and return the copy of it.
shipwreckRepository.findOne is used to find the entity based on the id provided and return the shipwreck

update method works bit differently. First we need to fetch the shipwreck with the given id and copy the properties from new shipwreck to existing shipwreck and then save it. See the above picture.
delete method fetches the shipwreck on the provided id and finally call delete operation on it.
Now all are wired together. Go ahead and restart the application and test it out
Hope you had a great learning session about creating a Spring Boot application from scratch. Please post your questions so that i can help you.
Happy Learning!!!

Thanks for the blog loaded with so many information
ReplyDeletejava training institute in chennai
java classes in chennai
Thanks a lot! :)
DeleteCreating Your First Spring Boot Application >>>>> Download Now
Delete>>>>> Download Full
Creating Your First Spring Boot Application >>>>> Download LINK
>>>>> Download Now
Creating Your First Spring Boot Application >>>>> Download Full
>>>>> Download LINK Hv
Thank you. Well it was a nice to post and very helpful information on Big Data Hadoop Online Course
ReplyDeleteCreating Your First Spring Boot Application >>>>> Download Now
ReplyDelete>>>>> Download Full
Creating Your First Spring Boot Application >>>>> Download LINK
>>>>> Download Now
Creating Your First Spring Boot Application >>>>> Download Full
>>>>> Download LINK yL