Docker Fundamentals and Running application in Docker Containers
Hi, this is Malathi Boggavarapu and i am going to introduce basically what the Docker is about with examples and pictures. So let's get started now.
Docker is an open source project and a company. It really started about 3 years ago in a France company called dotCloud where they wanted to build a better Paas (Platform as a Service) for developers. Over a period of time they recognized that it is going to be more on the lines of creating containers. It really started as open source project in a company but over a period of time they figured out containers is the way to go and eventually evolved the name to Docker.
Java gives you WORA - Write one, Run anywhere. Docker gives PODA. Why WORA is possible is that we take java soruce code, compile to class file format or Jar fiel or war file and that format is understood by the JVM. As JVM is running on variety of different operating systems which understands the class file format and does what you want to do.
On the same lines, Docker give you PODA - Package once Deploy anywhere. You application is not just Java. It could be any language, could be any OS, could have whole variety of drivers and plugins and extensions and libraries those need to be packaged up, tuning configuration. So it says you take the entire application, package it to an image and that image would then run on variety of platforms.
Java gives WORA which is Write once and Run anywhere and Docker gives you PODA but its not true PODA because image created on Windows would run on Windows and image created on Linux would run on Linux. But it still gives pretty good flexibility and how package up your entire java application, uplevel yourself and say this is my source of truth and this is going to be deployed across a variety of platforms.

Docker Mission, Infrastructure and workflow
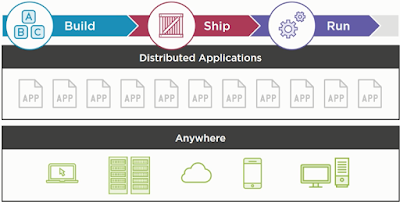
Now at a very high level, we can look that Docker mission is to Build applications, Ship applications and Run applications. They give you tools to build your applications, tools again for shipping applications across different operating systems and deploying, managing and scaling them is the Run part of it. These applications are truely Distributed applications because they could be run on the Cloud, in your data centre, in your laptop, Hybrid, it does not matter. As long as you have Docker engine running over there, it will understand the image format, it will run it and you are cool with that.
Typical question people ask is, i have been doing that with VM's number of years now.what does it really give me???
Well, lets take a look at the below picture then.
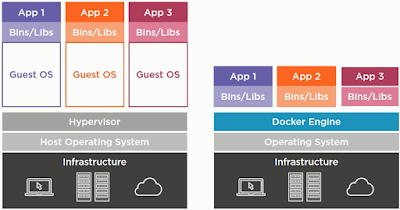
On the left side of the picture, you have infrastructure which is at the bottom such as Cloud, Data center or your laptop. On that data centre, you have host operating system running and on the host you run the Hypervisor and on top of that you run Guest OS. Basically Hypervisor is computer software, firmware or the hardware that runs virtual machines. Let's say you want to run your application on Ununtu and CentOS together, then you would install those two guest OS on the top of existing host OS. And then on each of the OS, you will bundle up your application including your application binaries and libraries. The problem over here is, you have the entire kernel space in host OS and the application space which we are not utilizing and on top of that you are putting another kernel space and another application space which is then required for your application.
So let's see how Docker works. You have the same infrastructure and instead of host operation system, you have an Operating System and on the Operating System the Docker engine will be run. Docker engine is the one that understands the Docker image. Image is where you bundle all of your application together and Docker engine says, you have the application, give it to me and i will run it. Docker requires certain linux technologies such as C groups, namespaces which gives you that control and flexibility to run the application and Docker engine basically simulates those functionalities on any machine or it may talk to the underlying Linux Operating System. But essentially your app only containing the userspace talk to docker engine and then talk to underlying Operating System where the kernel is sitting. So by breaking them apart into two different points, it really allows you higher density, allows better throughput and the way docker images are created will start up much faster. There are lot of benefits of using Docker as supposed to using the VM itself.
As a matter of fact, On a Mac Book if i run Virtual Box and on Virtual Box i could run 4 or 5 VM's and each VM has its own memory, disk space etc. And that's about it, then it comes to a crawl. But i can run hundreds of Docker containers and that allows me to break my application apart into multiple micro services and that makes more relevant.
There are essentially 3 pieces to Docker. There is the Client which will talk to Docker, We can think of Docker host as Linux, Windows or Mac where your docker host is sitting which understands what an image is, what a container is and that is also the place where scaling and managing happens.
Registry is where anybody and everybody building an image can push it over there. So let's say, you are the leader of the Ubuntu community, you want people be able to run ubuntu image on Docker. So people build the image, push it to Docker hub then from my side i have ability to say, Client, Go talk to docker host and run this image. By default Docker host is configured to download image from Docker hub, so it downloads the image and run it on host itself.

Registry is sort of Maven central for all docker images. Because Maven central is java specific, you only put jars and wars over there. But here anybody and everybody can put an image. For example in above picture you can see, there is an Ubuntu image, Couchbase image and Ngnix image. Anybody can put an image over there and then you can say i want to download that image. The way the image is created, it will have certain dependencies. You don't have to really start from the base operating system image. People has created multi tier purpose images, for example
let's say, "You have an Ubuntu, install JDK on it and want to run app on it. We can create an image for that which says ubuntu-java".
Then you say, Download ubuntu-java but that ubuntu-java has a dependency on ubuntu so you download that base image as well automatically. So it will become very easy. So from user perspective, all you are saying is "Just run the image" and it will figure out the dependencies and download all of them.
Another part is that the client is Dumb client. There is no STATE on the client side. The client really talk to the Docker host by giving the command Docker Run, Docker pull, Docker build. Behind the scenes what's happening is Docker host has a rest endpoint which listens to these requests and when you say Docker build, under the wire it is sending Rest request over TCP which goes to the endpoint and then the host listen to the request and talks to the registry and does the right thing that it needs to do.
So let's get started to learn about what a Dockerfile and Docker Image is.
Dockerfile is a text file where we put bunch of instructions or commands so that Docker can use it to create an image. See the below picture for instructions or commands that are available.
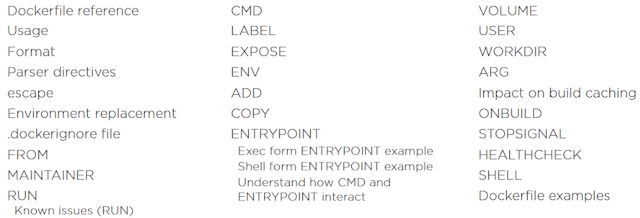
By using the complete set of commands which were shown in above picture, we build a Dockerfile.
So let's look at FROM in the above picture. Using FROM command we can refer to the base image that is going to be used while building an image. Example it can be used to ask 'i need the user space for Ubuntu or i need the user space for CentOS or i need a java image'. CMD is used to for let's say you can ask to do something like 'copy my jar file from here or do Yum install' and so on.
Now think about in real world use cases, let's say you are running a devops organization and you want everyone to use consistent development or deployment environment then you can create an image which comprises base operating system image and required packages and then say guys 'within our team we are going to use this image'. It reduces the impedance mismatch which means that there would not be any confusion between the team members about the versions of softwares that should be installed because it will be in image that is created.
We can have multiple versions of image. We can say java:8, java:9 and if you have dependency on java:7 then you can fallback to the older version of the release. So in docker terms, it is called as Tag. So we can say or ask what is the Tag of my image? By default the Tag is java:latest. If you want you can use different tags. So if you go to hub.docker.com, you will see many variety of Tags that are available which were assigned to each image.
Now let's see how we build an Image. We build a very classical "Hello World" image which have only two instructions in the Dockerfile.
FROM ubuntu
CMD echo "Hello world"
In the above Dockerfile, we say FROM ubuntu, so i am starting with base operating system image. It actually means that "Hello World" image requires ubuntu image to be pulled or downloaded.
CMD is command that is going to be run by Docker container. In Dockerfile, if we have multiple CMD's, it will ignore the previous CMD's and it will just pick the last CMD.
For suppose over a period of time, you want to change from "Hello world" to something else like "Hello world again" then you need to build a new image and you can Tag it appropriately. If you don't Tag, by default it is Latest. So the idea is you can always push the Latest version to the Docker hub and users have access to the latest version. It is just like think about SNAPSHOT version in the Maven language.
So let's take a look at little advanced sample Dockerfile.
FROM java
COPY target/hello.jar /usr/src/hello.jar
CMD java -cp /usr/src/hello.jar or .example.App
So here i am saying FROM java, here we are not using base Operating system but using java as base image which uses Debian as Operating system. Then we use COPY command to copy hello.jar. The last command is CMD. The fact that i am using FROM java is that it assumes that the JDK is already installed and it already has java in CLI path. So i can just say java -cp /usr/src/hello.jar or .example.App.
Some of the best practices to consider is as follows.
Containers should be ephemeral - When you are building an image, make sure that there is no state stored in them. While there are certain times where you have to store a state. Example databases are by nature stateful but there are ways we can deal with that. But when we are building a web application, make sure that it is stateless because that way if a container dies we can bring up the container anywhere else.
.dockerignore - Just like gitignore we have .dockerignore file. This is used to exclude files which are not relevant for the build.
Avoid installing unnecessary packages
Think about packages that you really want to install and keep it lean.
Run only one process per container
Very strongly recommended practice is run only one process per container. Using CMD people do all kind of funky things like people will invoke a script and script will fire up database and app server. If the container goes down there is a single point of failure. So it is highly recommended that there should be only one process per container.
Minimize the number of layers
When Docker builds a image it creates multiple layers, each instruction in file essentially becomes a layer. You really have to minimize the number of layers so that the lesser the number of layers is the faster the image is loading up and it makes your image much more efficient to run.
These are some of the best practices but you can always follow the below link to learn more.
https://docs.docker.com/develop/develop-images/dockerfile_best-practices/
Union File System
Union File System is another important thing to understand from Docker perspective. This is a standard Linux concept. What i mean by that is, if you look at java 8 image in the below picture, i am giving java:8 and this the Tag that we have discussed earlier in this session. If we look at java 8 image and if we look at Dockerfile of it, that will have FROM buildpack-deps:jessie-scm. Now if we look at Dockerfile for buildpack-deps:jessie-scm it will have another FROM and eventually you will realize java 8 image is actually build in the debian:jessie release. So you can literally track back to your parent POM or your parent Dockerfile and look at exactly what is happening. All of these layers are read-only layers that are collapsed and they are unionized to give union view of entire file system. That's what makes Docker really fast and really good to boot up and startup.

Now let's say you have downloaded an image Couchbase. See below picture. let's discuss this a bit so you will have clear understanding of Docker image and Docker file

Using docker images couchbase, you can see the docker images that were available. So if you want to see the history of the image, it shows you the commands that were executed to build an image under CREATED BY column and on the right size it shows the size of each image like 135MB - a base Operating system, 200MB - database and so on.
And also let's take a look at Docker image for Java. In below picture, you can see all the java images and the history of the commands that are executed to build java image. One important point to understand is the images are stored in Docker Host. None of the images are on Client. For development purpose i might have the Client and Host on the same machine which is OK and that's the flexibility you have because this is completely disconnected architecture. So today my HOST is here and tomorrow HOST can be running on some other machine, it doesn't matter. It just scales over there very well.

Now we install the Docker, Build an image and Run it. We also look about Docker Machine and about Docker Maven Plugin which is used to "Dockerize" a web application.
So let's start with Docker for Mac and Windows
Earlier Mac and Windows are two platforms where Docker was not supported natively because Docker is essentially a Linux technology. It is based on Linux containers, C groups and namespaces as we are saying earlier. But NOW we have it supported for Mac and Windows.
So now we are going to see what is Docker for Mac and Windows.
Native application and UI
It is a native application with a native UI. So you literally go to docker.com/getdocker. It's a public BETA. You can download the application by giving the docker hub id.
Auto update capability
It has a capability to auto-update itself because it is native docker application.
No additional software required, e.g. VirtualBox
Earlier if you were to run Docker on Mac or windows you were required to have an additional software such as Type 2 Hypervisor for example VirtualBox. So with Docker for Mac and Windows, we don't need that. you just download the native app and app is that will make you started. So how is it possible?
- OSX: xhyve VM using Hypervisor.framework. On OSX (Mac) we have Hypervisor framework particularly from 10.10 version onwards. It's a basic requirement for Docker for Mac. Hypervisor.framework creates xhyve VM and it is managed by Docker itself. So there is no dependency on third party tool if we are using Docker for Mac.
- Windows: Hyper-V VM - Similarly in windows they created Hyper-V VM and again that is managed by Docker.
Better Networking and filesystem mounting /notification.
We will talk more about this in later sections
Public Beta - docker.com/getdocker
This is the easy way to get started with Docker. Typical way the Docker started is, they did a restricted availability but now it's a public BETA so anybody can go and get Docker for Mac and windows. The download of Docker includes HOST and a Client. Registry could be a Saas(It's a hub.docker.com.) The HOST is pre-configured to talk to that Registry and do whatever needs to be done. You can certainly setup private Docker registry also very easily. Docker has a concept of Project and Product. So for example there is a Docker Registry Project which is a GitHub project and Docker has Product called DTR (Docker trusted registry) which has Security, Authentication, LDAP integration and all other concepts built-in. So you can either clone the Registry GitHub repo and setup your private registry or you can get commercial version and get commercial support on it. In addition there are other options like JFROG artifactory which can be setup as private Registry where you can push your Docker images.
It comes with Docker CLI, Docker Machine, Docker Compose - It is used to run multiple containers. We will talk about it bit later. Kitematic, ISO and Type 2 Hypervisor Vitualbox.
Quit Docker in your computer and go to the command prompt to create a docker machine
>docker-machine create -d=virtualbox docker4java

So here we created a docker machine called docker4java.
>docker-machine ls
It shows all the docker machines that are available on your computer. See the below picture.

In the last picture where we created docker machine, you can see last few lines, there it says 'Docker is up and running'. And also it says, how to connect Docker client to the Docker engine running on this virtual machine.
>docker-machine env docker4java

It says you need to export the environment variables and later you copy the last line from the output and run it. See below
>eval $(docker-machine env docker4java)
And now if i look at Docker environment variables, those are all set for me. Now you can run the command docker images to see the images that are available in the Docker host of this Docker machine. Now you can create an image, build and run it on the Docker machine that we created, as we did earlier.
You are a java developer, you build a Maven project and want to Dockerize it. To do that we have a Maven plugin. We can configure phases, so let's say you not only copy jar files or war files to local repo but also make a Docker image and push it to registry. The important part is, the earlier we introduce it into the cycle, the easier it is. It should not be like 'OK i am done with the application and how should i dockerize now'. That's the wrong way of thinking.
Let me show you an example and how we really do that using Maven plugin. Take a look at the below part of pom.xml file. We use docker profile where i am using docker-maven-plugin. We are using fabric8 plugin here. Using this plugin we are building an image. The image name is hellojava, base image is openjdk:latest and the command is java which executes jar file. Coming down, we see run block which run the image and highlights the "Hello World!" string in the output.
If you look at executions part of the pom.xml, you see the goal build. During the package phase, build goal should be called. If we build the package, it will automatically build the image for you. And when you install the package, it run the image and starting printing out the log for you.
<profile>
<id>docker</id>
<build>
<plugins>
<plugin>
<groupId>io.fabric8</groupId>
<artifactId>docker-maven-plugin</artifactId>
<version>0.20.1</version>
<configuration>
<images>
<image>
<name>hellojava</name>
<build>
<from>openjdk:latest</from>
<assembly>
<descriptorRef>artifact</descriptorRef>
</assembly>
<cmd>java -jar maven/${project.name}-${project.version}.jar</cmd>
</build>
<run>
<wait>
<log>Hello World!</log>
</wait>
</run>
</image>
</images>
</configuration>
<executions>
<execution>
<id>docker:build</id>
<phase>package</phase>
<goals>
<goal>build</goal>
</goals>
</execution>
<execution>
<id>docker:start</id>
<phase>install</phase>
<goals>
<goal>run</goal>
<goal>logs</goal>
</goals>
</execution>
</executions>
</plugin>
</plugins>
</build>
</profile>
This actually explains the base concept of Dockerizing Maven project using the docker-maven-plugin.
I think we reached long way in learning Docker.
Please make the session interactive because the more the session is interactive, the more we learn.
Happy Learning!!
What is a Docker?
Docker is an open source project and a company. It really started about 3 years ago in a France company called dotCloud where they wanted to build a better Paas (Platform as a Service) for developers. Over a period of time they recognized that it is going to be more on the lines of creating containers. It really started as open source project in a company but over a period of time they figured out containers is the way to go and eventually evolved the name to Docker.
Java gives you WORA - Write one, Run anywhere. Docker gives PODA. Why WORA is possible is that we take java soruce code, compile to class file format or Jar fiel or war file and that format is understood by the JVM. As JVM is running on variety of different operating systems which understands the class file format and does what you want to do.
On the same lines, Docker give you PODA - Package once Deploy anywhere. You application is not just Java. It could be any language, could be any OS, could have whole variety of drivers and plugins and extensions and libraries those need to be packaged up, tuning configuration. So it says you take the entire application, package it to an image and that image would then run on variety of platforms.
Java gives WORA which is Write once and Run anywhere and Docker gives you PODA but its not true PODA because image created on Windows would run on Windows and image created on Linux would run on Linux. But it still gives pretty good flexibility and how package up your entire java application, uplevel yourself and say this is my source of truth and this is going to be deployed across a variety of platforms.

Docker Mission, Infrastructure and workflow

Now at a very high level, we can look that Docker mission is to Build applications, Ship applications and Run applications. They give you tools to build your applications, tools again for shipping applications across different operating systems and deploying, managing and scaling them is the Run part of it. These applications are truely Distributed applications because they could be run on the Cloud, in your data centre, in your laptop, Hybrid, it does not matter. As long as you have Docker engine running over there, it will understand the image format, it will run it and you are cool with that.
Typical question people ask is, i have been doing that with VM's number of years now.what does it really give me???
Well, lets take a look at the below picture then.

On the left side of the picture, you have infrastructure which is at the bottom such as Cloud, Data center or your laptop. On that data centre, you have host operating system running and on the host you run the Hypervisor and on top of that you run Guest OS. Basically Hypervisor is computer software, firmware or the hardware that runs virtual machines. Let's say you want to run your application on Ununtu and CentOS together, then you would install those two guest OS on the top of existing host OS. And then on each of the OS, you will bundle up your application including your application binaries and libraries. The problem over here is, you have the entire kernel space in host OS and the application space which we are not utilizing and on top of that you are putting another kernel space and another application space which is then required for your application.
So let's see how Docker works. You have the same infrastructure and instead of host operation system, you have an Operating System and on the Operating System the Docker engine will be run. Docker engine is the one that understands the Docker image. Image is where you bundle all of your application together and Docker engine says, you have the application, give it to me and i will run it. Docker requires certain linux technologies such as C groups, namespaces which gives you that control and flexibility to run the application and Docker engine basically simulates those functionalities on any machine or it may talk to the underlying Linux Operating System. But essentially your app only containing the userspace talk to docker engine and then talk to underlying Operating System where the kernel is sitting. So by breaking them apart into two different points, it really allows you higher density, allows better throughput and the way docker images are created will start up much faster. There are lot of benefits of using Docker as supposed to using the VM itself.
As a matter of fact, On a Mac Book if i run Virtual Box and on Virtual Box i could run 4 or 5 VM's and each VM has its own memory, disk space etc. And that's about it, then it comes to a crawl. But i can run hundreds of Docker containers and that allows me to break my application apart into multiple micro services and that makes more relevant.
Docker Workflow
There are essentially 3 pieces to Docker. There is the Client which will talk to Docker, We can think of Docker host as Linux, Windows or Mac where your docker host is sitting which understands what an image is, what a container is and that is also the place where scaling and managing happens.
Registry is where anybody and everybody building an image can push it over there. So let's say, you are the leader of the Ubuntu community, you want people be able to run ubuntu image on Docker. So people build the image, push it to Docker hub then from my side i have ability to say, Client, Go talk to docker host and run this image. By default Docker host is configured to download image from Docker hub, so it downloads the image and run it on host itself.

Registry is sort of Maven central for all docker images. Because Maven central is java specific, you only put jars and wars over there. But here anybody and everybody can put an image. For example in above picture you can see, there is an Ubuntu image, Couchbase image and Ngnix image. Anybody can put an image over there and then you can say i want to download that image. The way the image is created, it will have certain dependencies. You don't have to really start from the base operating system image. People has created multi tier purpose images, for example
let's say, "You have an Ubuntu, install JDK on it and want to run app on it. We can create an image for that which says ubuntu-java".
Then you say, Download ubuntu-java but that ubuntu-java has a dependency on ubuntu so you download that base image as well automatically. So it will become very easy. So from user perspective, all you are saying is "Just run the image" and it will figure out the dependencies and download all of them.
Another part is that the client is Dumb client. There is no STATE on the client side. The client really talk to the Docker host by giving the command Docker Run, Docker pull, Docker build. Behind the scenes what's happening is Docker host has a rest endpoint which listens to these requests and when you say Docker build, under the wire it is sending Rest request over TCP which goes to the endpoint and then the host listen to the request and talks to the registry and does the right thing that it needs to do.
How to create Dockerfile and Docker Image
So let's get started to learn about what a Dockerfile and Docker Image is.
Dockerfile is a text file where we put bunch of instructions or commands so that Docker can use it to create an image. See the below picture for instructions or commands that are available.

By using the complete set of commands which were shown in above picture, we build a Dockerfile.
Now think about in real world use cases, let's say you are running a devops organization and you want everyone to use consistent development or deployment environment then you can create an image which comprises base operating system image and required packages and then say guys 'within our team we are going to use this image'. It reduces the impedance mismatch which means that there would not be any confusion between the team members about the versions of softwares that should be installed because it will be in image that is created.
We can have multiple versions of image. We can say java:8, java:9 and if you have dependency on java:7 then you can fallback to the older version of the release. So in docker terms, it is called as Tag. So we can say or ask what is the Tag of my image? By default the Tag is java:latest. If you want you can use different tags. So if you go to hub.docker.com, you will see many variety of Tags that are available which were assigned to each image.
Now let's see how we build an Image. We build a very classical "Hello World" image which have only two instructions in the Dockerfile.
FROM ubuntu
CMD echo "Hello world"
In the above Dockerfile, we say FROM ubuntu, so i am starting with base operating system image. It actually means that "Hello World" image requires ubuntu image to be pulled or downloaded.
CMD is command that is going to be run by Docker container. In Dockerfile, if we have multiple CMD's, it will ignore the previous CMD's and it will just pick the last CMD.
For suppose over a period of time, you want to change from "Hello world" to something else like "Hello world again" then you need to build a new image and you can Tag it appropriately. If you don't Tag, by default it is Latest. So the idea is you can always push the Latest version to the Docker hub and users have access to the latest version. It is just like think about SNAPSHOT version in the Maven language.
So let's take a look at little advanced sample Dockerfile.
FROM java
COPY target/hello.jar /usr/src/hello.jar
CMD java -cp /usr/src/hello.jar or .example.App
So here i am saying FROM java, here we are not using base Operating system but using java as base image which uses Debian as Operating system. Then we use COPY command to copy hello.jar. The last command is CMD. The fact that i am using FROM java is that it assumes that the JDK is already installed and it already has java in CLI path. So i can just say java -cp /usr/src/hello.jar or .example.App.
Docker file Best Practices
Some of the best practices to consider is as follows.
Containers should be ephemeral - When you are building an image, make sure that there is no state stored in them. While there are certain times where you have to store a state. Example databases are by nature stateful but there are ways we can deal with that. But when we are building a web application, make sure that it is stateless because that way if a container dies we can bring up the container anywhere else.
.dockerignore - Just like gitignore we have .dockerignore file. This is used to exclude files which are not relevant for the build.
Avoid installing unnecessary packages
Think about packages that you really want to install and keep it lean.
Run only one process per container
Very strongly recommended practice is run only one process per container. Using CMD people do all kind of funky things like people will invoke a script and script will fire up database and app server. If the container goes down there is a single point of failure. So it is highly recommended that there should be only one process per container.
Minimize the number of layers
When Docker builds a image it creates multiple layers, each instruction in file essentially becomes a layer. You really have to minimize the number of layers so that the lesser the number of layers is the faster the image is loading up and it makes your image much more efficient to run.
These are some of the best practices but you can always follow the below link to learn more.
https://docs.docker.com/develop/develop-images/dockerfile_best-practices/
Union File System
Union File System is another important thing to understand from Docker perspective. This is a standard Linux concept. What i mean by that is, if you look at java 8 image in the below picture, i am giving java:8 and this the Tag that we have discussed earlier in this session. If we look at java 8 image and if we look at Dockerfile of it, that will have FROM buildpack-deps:jessie-scm. Now if we look at Dockerfile for buildpack-deps:jessie-scm it will have another FROM and eventually you will realize java 8 image is actually build in the debian:jessie release. So you can literally track back to your parent POM or your parent Dockerfile and look at exactly what is happening. All of these layers are read-only layers that are collapsed and they are unionized to give union view of entire file system. That's what makes Docker really fast and really good to boot up and startup.

Now let's say you have downloaded an image Couchbase. See below picture. let's discuss this a bit so you will have clear understanding of Docker image and Docker file

Using docker images couchbase, you can see the docker images that were available. So if you want to see the history of the image, it shows you the commands that were executed to build an image under CREATED BY column and on the right size it shows the size of each image like 135MB - a base Operating system, 200MB - database and so on.
And also let's take a look at Docker image for Java. In below picture, you can see all the java images and the history of the commands that are executed to build java image. One important point to understand is the images are stored in Docker Host. None of the images are on Client. For development purpose i might have the Client and Host on the same machine which is OK and that's the flexibility you have because this is completely disconnected architecture. So today my HOST is here and tomorrow HOST can be running on some other machine, it doesn't matter. It just scales over there very well.

Learning Docker in more practical way
Now we install the Docker, Build an image and Run it. We also look about Docker Machine and about Docker Maven Plugin which is used to "Dockerize" a web application.
So let's start with Docker for Mac and Windows
Earlier Mac and Windows are two platforms where Docker was not supported natively because Docker is essentially a Linux technology. It is based on Linux containers, C groups and namespaces as we are saying earlier. But NOW we have it supported for Mac and Windows.
So now we are going to see what is Docker for Mac and Windows.
Native application and UI
It is a native application with a native UI. So you literally go to docker.com/getdocker. It's a public BETA. You can download the application by giving the docker hub id.
Auto update capability
It has a capability to auto-update itself because it is native docker application.
No additional software required, e.g. VirtualBox
Earlier if you were to run Docker on Mac or windows you were required to have an additional software such as Type 2 Hypervisor for example VirtualBox. So with Docker for Mac and Windows, we don't need that. you just download the native app and app is that will make you started. So how is it possible?
- OSX: xhyve VM using Hypervisor.framework. On OSX (Mac) we have Hypervisor framework particularly from 10.10 version onwards. It's a basic requirement for Docker for Mac. Hypervisor.framework creates xhyve VM and it is managed by Docker itself. So there is no dependency on third party tool if we are using Docker for Mac.
- Windows: Hyper-V VM - Similarly in windows they created Hyper-V VM and again that is managed by Docker.
Better Networking and filesystem mounting /notification.
We will talk more about this in later sections
Public Beta - docker.com/getdocker
This is the easy way to get started with Docker. Typical way the Docker started is, they did a restricted availability but now it's a public BETA so anybody can go and get Docker for Mac and windows. The download of Docker includes HOST and a Client. Registry could be a Saas(It's a hub.docker.com.) The HOST is pre-configured to talk to that Registry and do whatever needs to be done. You can certainly setup private Docker registry also very easily. Docker has a concept of Project and Product. So for example there is a Docker Registry Project which is a GitHub project and Docker has Product called DTR (Docker trusted registry) which has Security, Authentication, LDAP integration and all other concepts built-in. So you can either clone the Registry GitHub repo and setup your private registry or you can get commercial version and get commercial support on it. In addition there are other options like JFROG artifactory which can be setup as private Registry where you can push your Docker images.
Installing Docker, Building an Image and Running Containers
Install Docker Community Edition by navigating to the url docker.com/getdocker. Choose Docker CE for Windows and install the exe file.
After installing Docker for Windows, it starts running. Now open the Command prompt or Windows powershell. I just used Windows command prompt.
First let's try with a basic command.
docker --version. It shows the docker version that is installed. See the output below.
Docker version 18.03.0-ce, build 0520e24
Now create a directory and create a simple text file and name it as Dockerfile and add some commands to it. You can name it however you want.
Example
FROM openjdk:8
CMD java -version
Save the Dockerfile and navigate to that particular directory in command prompt and execute the below command to build an image.
>docker build -t docker-java .
build is used to build an image with name docker-java and we pass context as Dot (.)
But after executing the command we get an error. Please note, i am discussing also the problems i faced when i installed Docker and try to build some images.

In the above picture when i tried with the command docker build -t docker-java . Docker throws an error saying 'The system cannot find the file specified'. This is because i created Dockerfile in Notepad, it automatically appends .txt to the file name. So i need to explicitly add the file name by using the flag -f . So inorder to correct the above error i used the below command. You can use any file name but make sure that you specify the file name with the flag -f
docker build -t docker-java -f ./Dockerfile.txt .
But this command fails again for some other reason. It is asking for the authentication details to login to the website hub.docker.com inorder to pull the dependencies required.
So do docker login --username=myUser --password=mypassword https://index.docker.io/v1
This will allow you to login to the Docker hub and allow you to pull out the required dependencies from the Registry. So in our Dockerfile we are trying to pull out the dependency Java 8 from Registry inorder to execute the command using CMD.
So now we have logged in to the Registry and let's go back to our build command again and execute it. This time we are adding one more flag --platform linux
docker build --platform linux -t docker-java -f ./Dockerfile.txt .
If we do not --platform linux to the command, it throws error because some of the images are not supported to download in Windows. So we need to switch to Linux and execute the command. So in our example we are switching to Linux platform inorder to download the base image openjdk:8 image.
This time the command will be executed successfully. It pulls out the dependencies that are required from the Registry, in our case it is openjdk:8 and execute the command using CMD. See the below picture.

In the above picture you can see that whatever instructions Dockerfile is having, Docker will execute all of them in sequential order. First it execute FROM openjdk:8 from the Dockerfile to pull it out from the Registry. It will do that only if you don't have jdk installed on your machine. Installation of jdk will be skipped when it is already exists.
Now we should know how to run the image. But before that we should know what images exists in our Registry. To know that use command docker images. See the below picture.

It shows all the images that were created by us. As i have build docker-java multiple times, it has created those many images. The recently created docker-java image will be tagged as latest. So whenever someone pull docker-java image without specifying Tag name, latest will be pulled out always. We can also give the Tag names for the older versions of image. We will see about that later.
To run the image we use the below command. Inorder to start run command in interactive mode, we use flag -it. See the below command and picture for clear illustration
docker run -it docker-java
As you can see in the below picture, it prints openjdk version as 1.8.0_162. That's what we are expecting the result of the CMD defined in Dockerfile.

docker ps -> Shows all the images that were currently running.
docker ps -a -> Shows all the images that are actively running and also the images that were executed at some point of time and exited.
So far we have run containers in an interactive way but there are other ways to run the containers.
Now let's play with jboss/wildfly server. It is an Redhat's open source application server.
docker run -it -p 8080:8080 jboss/wildfly.
Container residing on a port but that port is not exposed on the Host yet. So to expose that port we use -p and add 8080:8080. the first one is the port on the host and the second one is the port on the container. So i am taking port 8080 in the container and mapping it to the Host,
Now it will run the container and the 8080 port is exposed on the host.
If you execute the command, Jboss wildfly will be started on the port 8080. Now if we go to the browser and say localhost:8080, it will open the home page of the JBoss wildfly application server.
If you want to run the same command in the background mode then use -d (detached) option,
docker run -d -p 8080:8080 jboss/wildfly.
It starts the jboss/wildfly container in the background. Now you can use docker ps to see that the container is running in the background mode.
docker --help -> It will provide help about various docker commands. It is just phenomenal.
docker -run --help -> It shows all the help about docker part of run
docker -build --help -> It shows all the switches that are available for build.
If you are running Docker for Mac and Docker for windows, they do have stricter requirements. Because of the fact that OSX version depends on Hypervisor version 10.10. The way it runs on windows is you do need Windows 10 64-bit. So Docker is restricted to those platforms. But to run on older versions of Windows of Mac, we use Docker Machine
Docker Machine is the CLI that allows to create Docker Host on Computer or cloud provider.
docker-machine create --driver=virtualbox myhost
driver in this case is virtualbox. So i am likely to create VM's on my local windows. So the command is used to provision a virtual machine on my computer or cloud and install Docker Host in it. This is basically a tiny Linux VM that fires up on the appropriate operating system and configure your Docker Host over there. Once the Docker Host is provisioned, you need to configure the Docker client to talk to the HOST and you can create and pull images, Start, Stop and restart containers and you can Upgrade docker as well. Unlike Docker for Mac and Windows which will do auto-update, we should manually update the Docker machine.
The easiest way to start with Docker Machine is to use Docker Toolbox. See the below picture what the Docker Toolbox provides. Download Docker Toolbox for windows or Mac before going further.

After installing Docker for Windows, it starts running. Now open the Command prompt or Windows powershell. I just used Windows command prompt.
First let's try with a basic command.
docker --version. It shows the docker version that is installed. See the output below.
Docker version 18.03.0-ce, build 0520e24
Now create a directory and create a simple text file and name it as Dockerfile and add some commands to it. You can name it however you want.
Example
FROM openjdk:8
CMD java -version
Save the Dockerfile and navigate to that particular directory in command prompt and execute the below command to build an image.
>docker build -t docker-java .
build is used to build an image with name docker-java and we pass context as Dot (.)
But after executing the command we get an error. Please note, i am discussing also the problems i faced when i installed Docker and try to build some images.

In the above picture when i tried with the command docker build -t docker-java . Docker throws an error saying 'The system cannot find the file specified'. This is because i created Dockerfile in Notepad, it automatically appends .txt to the file name. So i need to explicitly add the file name by using the flag -f . So inorder to correct the above error i used the below command. You can use any file name but make sure that you specify the file name with the flag -f
docker build -t docker-java -f ./Dockerfile.txt .
But this command fails again for some other reason. It is asking for the authentication details to login to the website hub.docker.com inorder to pull the dependencies required.
So do docker login --username=myUser --password=mypassword https://index.docker.io/v1
This will allow you to login to the Docker hub and allow you to pull out the required dependencies from the Registry. So in our Dockerfile we are trying to pull out the dependency Java 8 from Registry inorder to execute the command using CMD.
So now we have logged in to the Registry and let's go back to our build command again and execute it. This time we are adding one more flag --platform linux
docker build --platform linux -t docker-java -f ./Dockerfile.txt .
If we do not --platform linux to the command, it throws error because some of the images are not supported to download in Windows. So we need to switch to Linux and execute the command. So in our example we are switching to Linux platform inorder to download the base image openjdk:8 image.
This time the command will be executed successfully. It pulls out the dependencies that are required from the Registry, in our case it is openjdk:8 and execute the command using CMD. See the below picture.

Now we should know how to run the image. But before that we should know what images exists in our Registry. To know that use command docker images. See the below picture.

It shows all the images that were created by us. As i have build docker-java multiple times, it has created those many images. The recently created docker-java image will be tagged as latest. So whenever someone pull docker-java image without specifying Tag name, latest will be pulled out always. We can also give the Tag names for the older versions of image. We will see about that later.
How to run the image
To run the image we use the below command. Inorder to start run command in interactive mode, we use flag -it. See the below command and picture for clear illustration
docker run -it docker-java
As you can see in the below picture, it prints openjdk version as 1.8.0_162. That's what we are expecting the result of the CMD defined in Dockerfile.

docker ps -> Shows all the images that were currently running.
docker ps -a -> Shows all the images that are actively running and also the images that were executed at some point of time and exited.
Docker Options and --help
So far we have run containers in an interactive way but there are other ways to run the containers.
Now let's play with jboss/wildfly server. It is an Redhat's open source application server.
docker run -it -p 8080:8080 jboss/wildfly.
Container residing on a port but that port is not exposed on the Host yet. So to expose that port we use -p and add 8080:8080. the first one is the port on the host and the second one is the port on the container. So i am taking port 8080 in the container and mapping it to the Host,
Now it will run the container and the 8080 port is exposed on the host.
If you execute the command, Jboss wildfly will be started on the port 8080. Now if we go to the browser and say localhost:8080, it will open the home page of the JBoss wildfly application server.
If you want to run the same command in the background mode then use -d (detached) option,
docker run -d -p 8080:8080 jboss/wildfly.
It starts the jboss/wildfly container in the background. Now you can use docker ps to see that the container is running in the background mode.
docker --help -> It will provide help about various docker commands. It is just phenomenal.
docker -run --help -> It shows all the help about docker part of run
docker -build --help -> It shows all the switches that are available for build.
Docker Machine and Docker ToolBox
If you are running Docker for Mac and Docker for windows, they do have stricter requirements. Because of the fact that OSX version depends on Hypervisor version 10.10. The way it runs on windows is you do need Windows 10 64-bit. So Docker is restricted to those platforms. But to run on older versions of Windows of Mac, we use Docker Machine
Docker Machine is the CLI that allows to create Docker Host on Computer or cloud provider.
docker-machine create --driver=virtualbox myhost
driver in this case is virtualbox. So i am likely to create VM's on my local windows. So the command is used to provision a virtual machine on my computer or cloud and install Docker Host in it. This is basically a tiny Linux VM that fires up on the appropriate operating system and configure your Docker Host over there. Once the Docker Host is provisioned, you need to configure the Docker client to talk to the HOST and you can create and pull images, Start, Stop and restart containers and you can Upgrade docker as well. Unlike Docker for Mac and Windows which will do auto-update, we should manually update the Docker machine.
The easiest way to start with Docker Machine is to use Docker Toolbox. See the below picture what the Docker Toolbox provides. Download Docker Toolbox for windows or Mac before going further.

It comes with Docker CLI, Docker Machine, Docker Compose - It is used to run multiple containers. We will talk about it bit later. Kitematic, ISO and Type 2 Hypervisor Vitualbox.
Quit Docker in your computer and go to the command prompt to create a docker machine
>docker-machine create -d=virtualbox docker4java

So here we created a docker machine called docker4java.
>docker-machine ls
It shows all the docker machines that are available on your computer. See the below picture.

In the last picture where we created docker machine, you can see last few lines, there it says 'Docker is up and running'. And also it says, how to connect Docker client to the Docker engine running on this virtual machine.
>docker-machine env docker4java

It says you need to export the environment variables and later you copy the last line from the output and run it. See below
>eval $(docker-machine env docker4java)
And now if i look at Docker environment variables, those are all set for me. Now you can run the command docker images to see the images that are available in the Docker host of this Docker machine. Now you can create an image, build and run it on the Docker machine that we created, as we did earlier.
Docker Maven plugin
You are a java developer, you build a Maven project and want to Dockerize it. To do that we have a Maven plugin. We can configure phases, so let's say you not only copy jar files or war files to local repo but also make a Docker image and push it to registry. The important part is, the earlier we introduce it into the cycle, the easier it is. It should not be like 'OK i am done with the application and how should i dockerize now'. That's the wrong way of thinking.
Let me show you an example and how we really do that using Maven plugin. Take a look at the below part of pom.xml file. We use docker profile where i am using docker-maven-plugin. We are using fabric8 plugin here. Using this plugin we are building an image. The image name is hellojava, base image is openjdk:latest and the command is java which executes jar file. Coming down, we see run block which run the image and highlights the "Hello World!" string in the output.
If you look at executions part of the pom.xml, you see the goal build. During the package phase, build goal should be called. If we build the package, it will automatically build the image for you. And when you install the package, it run the image and starting printing out the log for you.
<profile>
<id>docker</id>
<build>
<plugins>
<plugin>
<groupId>io.fabric8</groupId>
<artifactId>docker-maven-plugin</artifactId>
<version>0.20.1</version>
<configuration>
<images>
<image>
<name>hellojava</name>
<build>
<from>openjdk:latest</from>
<assembly>
<descriptorRef>artifact</descriptorRef>
</assembly>
<cmd>java -jar maven/${project.name}-${project.version}.jar</cmd>
</build>
<run>
<wait>
<log>Hello World!</log>
</wait>
</run>
</image>
</images>
</configuration>
<executions>
<execution>
<id>docker:build</id>
<phase>package</phase>
<goals>
<goal>build</goal>
</goals>
</execution>
<execution>
<id>docker:start</id>
<phase>install</phase>
<goals>
<goal>run</goal>
<goal>logs</goal>
</goals>
</execution>
</executions>
</plugin>
</plugins>
</build>
</profile>
This actually explains the base concept of Dockerizing Maven project using the docker-maven-plugin.
I think we reached long way in learning Docker.
Please make the session interactive because the more the session is interactive, the more we learn.
Happy Learning!!

Hi Malathi, its Really awesome stuff about Docker , am facing one issue while build docker image , its not able to pull openJdk and jdk8 from docker hub , environment am using Windows so could you please assist me .
ReplyDeleteHi, what error it is giving in the console. Please provide more information
DeleteI appreciate your work on Docker. It's such a wonderful read on Docker tutorial. Keep sharing stuffs like this. I am also educating people on similar Docker so if you are interested to know more you can watch this Docker tutorial:-https://www.youtube.com/watch?v=sYr4frA_1d8
ReplyDelete