Git Fundamentals
Hi, I am Malathi Boggavarapu working at Volvo Group and i live in Gothenburg, Sweden. I have been working on Java since several years and had vast experience and knowledge across various technologies.
This post gives you the introduction to the GIT version control system.
The very first version control system were developed in early 70's and operated on a single file and had no networking support.These were the systems such as SCCS and RCS. They are operated on a single file so that you will have a file such as foo.c and have multiple versions of that file. But there was no correspondence between different files within the repository. There was no notion that version 1.1 of foo.c work with version 1.1 of bar.c. It could be arbitrary. So we only had single files. This lead to the innovation of having a multi file system or the second generation.
Second Generation
This is typified by centralized version control system such CVS, VSS, SVN, TFS and Preforce. All of these are multi files centralized system so that you can checkout into a working copy on your local system, all of the files necessary for particular version of a repository.
Third Generation
Along came the third generation which are the Distributed Version Control Systems such as GIT, Hg,BitKeeper and Bazaar. These work on ChangeSets. These ChangeSets can be shipped around and both client and servers can have the entire repository present which allows us to do the interesting things.
If you want to read more about the history of version control, refer to the article
http://www.ericsink.com/vcbe/html/history_of_version_control.html
Some of the advantages of DVCs over the centralized one is the ability to have different topologies.
Different Topologies
1) If we want to use Centralized model, we still can by having the developers push their changes to central repository. This is commonly done in enterprise environments.
2) we can also use Hierarchial model. It has developers pushing their changes to sub-system based repositories and those sub-system based repositories are periodically merged into a main repository.
This is done in Linux kernel development because linux kernel is very large. There are seperate sub-system repositories like graphics, networking file systems and other portions of linux kernel. those sub-system repositories are periodically merged with main linux kernel so that development can continue on its way
3) We can also use a Distributed model where developers push their changes to their own repository and the project maintainers pull changes to official repository if they deemed valuable. This is very common in open source projects on GitHUB where if we want to contribute changes, you can fork main repository, make your changes and issue a pull request to the project maintainer.
Another advantage of DVC's is backups are extreamly easy. A backup is simply the clone of repository. So if something happens to your main server, simply standup the other server and clone the repository to it.
Git was created by Linus Torvalds, who also created Linux. Git creation was prompted by Linux-BitKeeper separation. BitKeeper is a commercial DVCs that is used by Linux kernel team from 2002 to 2005. When BitKeeper decided to stop supplying the linux kernel team with free licenses of BitKeeper, Linux started Git project in 2005 to create their own DVCs. It is written in Perl and C and runs on wide variety of operating systems including Linux, Mac OS 10, windows and many other commonly used operating systems available today.
Its main design goals include Seed, simplicity, Strong branching and merging support, a fully Distributed nature and to scale well for larger projects. Remember this was designed to be used on linux kernel which is a very large piece of software
Now let see how to install Git on windows
msysGit (http://msysgit.github.com)
Go to the website and click on Downloads link. Download the latest version of git and launch the installer. Now Git setup wizard will be opened. Go through some general setup information of your own choice. I am only discussing about some important setup information. If you see below picture, if you want 'Windows explore integration', i would recommend using Git extensions. Stay away from Tortoise Git as that is older project and much more closely mimics Tortoise SVN and does not explore full power of Git. Leave the rest of the options as is.

Clicking on Next to Next button, we see the below wizard. This is one the important menu item. By default it is the first option 'Git bash'. But if we want to include unix tools on windows command prompt, chose the last option. It will only replace windows find commands with more powerful unix commands. So if you can choose according to your interest.

By default Git only have line feeds(LF) in the repository. In windows we use both Character returns and line feeds to know line endings. Some people advocate 'checkout as-is, commit as-is', so your repository will have character return line feeds and it really depends on whom you are sharing with. If the project is cross-platform project which is going to build on Unix, Mac and windows, we should chose the first option. If you are working on windows only project, chose the last option.

Clicking on Next, will install git. And immediatly Windows Powershell will be opened.
git --version - Shows the version of the Git installed.
git init - It creates a repository test which assures me that git is working on the system

Now the git is installed on system and we will see how we configure them. Git provides three different configuration stores.
1) System level configuration
It is stored in /etc/gitconfig or C:\Program Files(x86)\Git\etc\gitconfig
This git configuration is applied to the entire computer that is installed on and you can access it using
git config --system
2) User level configuration
The second level is user level. We can access it using git config --global. It's global for a particular user and is stored in user home directory in a file called .gitconfig
3) Repository level configuration
You access this by using git config without any specifier and is stored in .git/config file in each repo.
How to configure Git
Let's see how we configure Git. It is not very common to modify system level configuration file but much more common to modify global/user level config and repository config file. Let's try the below commands
git config --global --list
Initially it gives 'Unable to read config file; No such file'
Now we try to add some info to the global or user level config file
git config --global user.name "Malathi Boggavarapu"
git config --global user.email "malathiboggavarapu@gmail.com"
git config --global --list - It shows the global config file that was created with above info.
cat ~/.gitconfig - shows the content of file that was created just now.
git config --global core.editor - The core editor is the default editor that you want to use when editing commit messages or viewing diffs and other pieces of information from Git. If you are EMACS user, you can use emacs or vim user, you can use vim or Notepad++, Notepad.
git config --global help.autocorrect 1
What autocorrect = 1 does is, if you go to your project directory and try git statsu and i misspell it. With autocorrect, it will do a fussy match on that command name and guess what you want to use instead. By setting it to 1, it waits for 0.1 seconds before it actually executing commands. If you set autocorrect to 0, it does not do auto-correcting and if you set to higher number then it will wait for that many tens of milliseconds before performing that action. So i found it very useful especially when you are typing quickly , if you make minor spelling mistake in git command, it will use fussy match to determine which command that you want to use.
git config --global color.ui auto
What auto will do is, it will use colors to show lot of git information. So when we are doing diffs or when we are showing status, it will colours the output.By setting it to auto, it is going to detect whether it is running within a script. If it is running within a script, it will not put color and put escape sequences so that logs are easier to parse. But if it is detected that as running in the terminal, it will be put the escape codes to colorize the output.
git config --global core.autocrlf true|false|input
true - convert CRLF to LF. So when we commit to repository, it will change CRLF combination which is used typically in windows into solely a LF which is then stored in a repository. when you check those files out, it will convert those text files back. It will only perform the actions on text files not on binary files. So it is not going to corrupt binary files.
false - Do nothing. That is commit CRLF to repository and store them there and don't do anything when you pull them back out. If you are only doing Windows development using Git then this might be the option but if you are doing cross platform development, you will end up having CRLF in your repo which will then endup checked out onto other platforms like linux, BSD and Mac OS X which don't generally use CRLF.
input - convert CRLF to LF when you put it into the repo but don't do any conversion on the back out.
So to summarize, on windows, we can use the option true, on Mac or Linux we can use input
So to check the result of all these configuration options we added to the gitconfig file until now, do the below commands.
git config --global --list to see all of the options
cat ~/.gitconfig - Will show the actual contents of the file
If you go to the project repository folder, you will find .git\config file.
cat .git/config
It specifies all the information for the repository. See below for example.

Now if we add a username to the config file, it will override the existing user name
git config user.name "Malathi"
git config --list - you can see that user.name will be overriden to "Malathi".
So these config sources are hierarchial.The user level one overrides any system level settings and repo level one overrides user or global level settings. So if you want to change CRLF just for the repository you can do using git config core.autocrlf true. And you can remove something into a gitconfig, use git config --unset core.autocrlf
You can also simply edit, for example vim .git/config - it will open the file then and there and you can just edit the file as you like.
Creating a local repository, adding files and committing changes
I have an empty directory GitFundamentals which i would like to change to local git repository.
Let me explain the commands in the below image so that it would be easy to understand.

git init - It creates .git directory which contains a repository and all of its metadata. I can add file to this repository by echoing "Hello, Git" to a README.txt file.
echo "Hello, Git" > README.txt
git status - Tells me that README.txt is an untracked file and git does not have it in repo yet.
Try adding the file to staging area using git add README.txt
Now again try git status. Git now notices that the file is a new file and is staged to be added to a repository which i can do by running git commit
git commit brings up the default text editor where you can add commit message.
git log - You can see the commits that are done in the repo. You can see Author, date information and also the commit sha. Git identifies the commits by the sha1 hash of the commit.
update the README.txt file by adding a second line "Hello, again"
git add -u - You can add all modified files to the repo.
git commit -m "Updated README.txt" - Commit a file with commit message inline.
git diff --stat --cached origin/master - It will show the files that need to be pushed.
Viewing history and diffs
git log - It shows the two commits in Git repo which are listed in reverse chronological order. So the more recent commits are at the top and latest commits are at the bottom. If you notice the below picture, it shows commit hashes too.
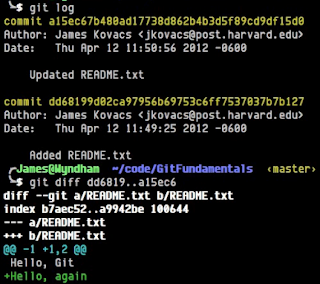
If i want to find what is changed between these two commits, i can do as follows
git diff dd6819..a15ec6 - Note that the "Hello, again" has been added (in the above picture)
So always working with sha1 hashes can be difficult so Git provides easy way of specifying these things. So we can also do it in easy way as below
git diff HEAD~1..HEAD
The latest commit is known as HEAD, i can also go back from HEAD by using ~1. The above command shows the differences between the latest commit and first commit as per our example
We can also specify it in more easy way using git diff HEAD~..
Let's add few more files now using touch command.
touch file1.txt file2.txt
git add -u - Going to add all updated files to staging area. Git has a notion of this staging area which of the files or changes that are going to add in next commit. Remember that -u option only adds the updated files to the staging area, that means files that has been updated or deleted.
git add -A - This A option adds all files including untracked ones. You should be careful while using this option to make sure that you are not accidentally adding files that you are not intended to.
In our example, it will add file1.txt and file2.txt files to the staging area.
You can also delete and rename files and follow the same sequence of commands such as add and commit to add to the staging area and commit the files.
Undoing changes to the working copy
If i want to undo the changes of a file, simply do git checkout [filename] to pull that out of the repo. By default it grabs the HEAD version. You can checkout files form the repo inorder to cleanup or revert changes that you made by mistake or changes that are a bad idea.
git reset --hard - Reset the working copy back to the HEAD.
git clean -n - It shows the files that woudl be removed.
git clean -f - Removes the temporary files from the repo.
Its easy way to clean up the working copy.
Ignoring files with .gitignore
Now let's say i do have something like log directory which contain some log files. Logs are constantly changing as the application runs and i dont want to commit these log files to my repo. So git provides .gitignore file. Open the file and add info to it.
/logs/*.txt
/logs/*.log
/logs
you can add any format but make sure tha paths are relative to your repository.
Let's look at cloning our remote repo to our local machine. In our example i use jquery repository on github.
git clone https://github.com/jquery/jquery.git
This is going to download the entire history of the project, all of the commits that have been made to the jquery repo. You can use git log command to see the commits that have been made to the project. To see more condensed version, use git log --oneline. You can see commit per line.
Basic repository statistics
git log --online | wc -l - If we want to know how many commits exists in the repo, you can use word count (wc) along with -l (alphabet l).
git log --online --graph - Provides graph on left hand side showing difft branches and merges that happened. So we can see how the history of the project is changed. If you see the below picture, on the left hand side, you see graph which indicates different branches and merges for various request that were made.

git shortlog - It lists all the authors and commit messages for each of them. It also provides number of commits each author has made. See below.

git shortlog -sne
s -> If i don't want to have individual commit messages and want summary,
n -> orders numerically by number of commits.
e -> include users email addresses.
See the below example when we use options sne to the shortlog. The first column is number of commits that were made by the user and second column is the user name and thrid column is their corresponding email address.

We can also take a look at any of the commits that were made.
git show HEAD - what is the last commit made for the query project.
git show [commit hash] - It shows all the changes that were made under the particulat commit by identifying using commit hash.
git remote - It shows that we have got one remote called origin. origin is the git default name from where the source come from.
git remote -v - It shows both the urls for fetch and push for that particular remote.
See the below picture

git branch - You can view all branches in your repository.
git branch -r - Display remote branches
Branches are often used for temporary working copies, to seperate main line development from bug fixes.
git tag - Display tags. These are stable points and known points in your codebase where you can often tag versions.
The remote repository is automatically added when we clone a repository for example from GITHUB but if i have local repo and i want to add a remote destination to it, i can use the below command to do it.
git remote add origin https://github.com/....
origin can be anything, i had chosen some arbitrary name here. So if someone sends a pull request, you can add their public repository and then pull their changes into your working local copy to examine. So you can have multiple remotes and it is done commonly in git inorder to evaluate patches or pull requests that have been made to your project. Now that remote has been added. I can do the following command
git fetch - Will pull down any changes from that remote repo. We can run as many times as we want. If we have multiple remotes, i can specify from which remote to fetch from.
Example : git fetch origin
git log origin/master - origin/master is the name of the remote branch. It shows all the changes that were committed into the repository.
If we have some new commits in the repo and does not exist in your local working copy, then do a merge operation. See below.
git merge origin/master
We will discuss more about merge later.
If i do git branch -r, i can see that remote branch origin/master that i just merged from (as said above)
git fetch; git merge origin/master - We can specify multiple commands at the same time. This command will fetch from rempote repo and do merge the changes to local repo.
git branch --set-upstream master origin/master - Setting up upstream branch is introduced in Git 1,7. Upstream tracking branch is basically what branch remotely does my local branch nearer. master is my master branch (local one) and origin/master is the branch of remote repo. Once i set this remote tracking branch i can do the following command to pull out the changes from the remote repo to local repo.
git pull - It is the shortest form of command git fetch; git merge origin/master. It pulls any changes down to local repo. If i do not want to use upstream branch as said above, i can simply use git pull origin master where origin master is the remote branch.
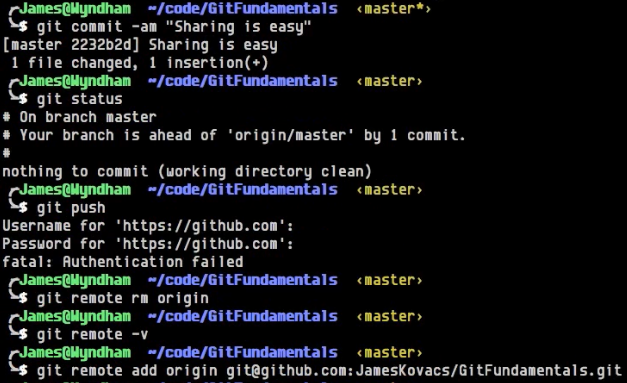
If we look at first command git commit -am "Sharing is easy", we are committing changes of a file to local repository and we want to push the changes to the remote repository. Now when we do git push, it ask for username and password to access github. Instead of doing this way, we are going to follow a slightly different approach here.
We do remove remote origin using git remote rm origin and add it using the ssh version of the url. The advantage of the ssh version is that it is going to use my ssh key to authenticate with github. Now if i do git push, it is not going to prompt for the password but it just push the changes to the github.
So if you are pushing the changes back up to the github repository, it is easier to use ssh url rather than http url. http require username and password whereas the ssh version can use your ssh key to do the authentication for you.
Lets look at tagging the repo. We can tag a repo by using the below commands
git tag v1.0 - v1.0 is the tag name and it is an unsigned tag.
git tag - It shows the tags that were created
git tag -a v1.0_with_message - It will annotate or message to associate with a tag.
git tag -s v1.0_signed - We can sign a tag using this command.
We can also verify the tags. To verify the created tags we use the following commands. See the picture.
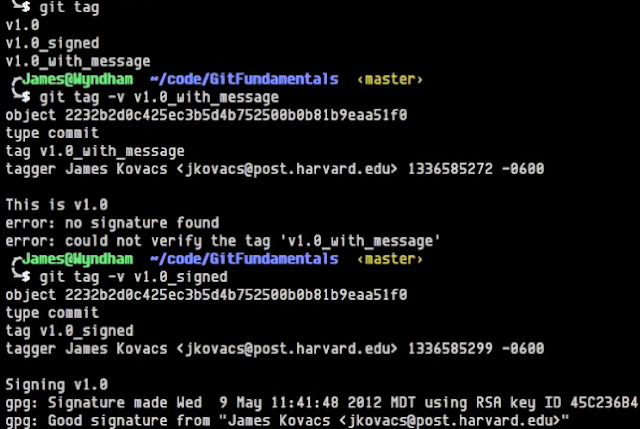
The above picture is very clear. For the programmer there is no need to explain further i believe. So if you are exposing a public project and you want to ensure that certain commits can be verified and in other words that it is an official commit, you can then use signing to identify the commits.
To push tags, we need to perform git push --tags, to create new tags in github repository. You can go to github and check your repository -> tags tab to see the tags that were pushed by you.
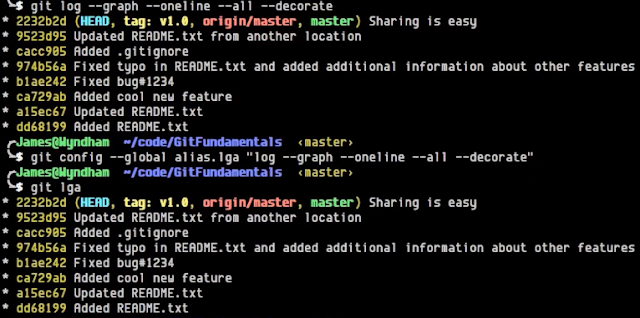
First we look at how to visualize the branches. We have already discussed about the command git log --graph --oneline which gives us the list of commits on the current branch using a graph on left hand side. Now we are going to add some more options to add the visualizers for our branches.
git log --graph --online --all --decorate -> all allows us to visualize all the branches rather than the current branch and decorate applies any labels to the commits such as HEAD, tags, remote branches and the local branches.
So typing this out everytime is cumbersome. So we can add an alias for this as below
git config --global alias.lga "log --graph --oneline --all --decorate".
git lga - It will do exactly what the above command does git log --graph --online --all --decorate
See the below picture to understand easily.
git branch feature1 - It will create a branch with name feature1
git checkout feature1 - We will be switched to the branch feature1
git branch fix1 974b56a - It will create a branch based on the commit id. More frequently we will be creating fixed branches from the tags or local branches.
Renaming and deleting branches
git branch -m fix1 Bug1234 - It will rename the branch fix1 to Bug1234
git branch -D Bug1234 - It will delete the branch Bug1234
git checkout -b feature2 - It will create a branch and switch to it automatically if you are in a different branch
git reflog - This is a log of all references where HEAD is pointed. We can actually see where the branch Bug1234 is created and use corresponding sha1 to recover the branch
git branch Bug1234 5a78c8b - It will create a branch Bug1234 using the commit hash.
git checkout Bug1234 - You can see that the branch Bug1234 is recovered.
git stash list - You can see the changes are in git stash. It is a holding area for your pending chnages.
git stash apply - It will pull those changes back that were saved using git stash command. You can check the files and see the changes were re-applied again.
git stash pop - It pops the top item of the stash and applies it to my current working copy. It removes the top item from the stash list.
git stash drop - It will drop the reference to that stash
git stash branch feature2_additional - Its going to createthe new branch, check it out and apply the stash to it.
Stashing is very useful way for as temporary holding area for changes that are not ready to commit to a branch and you dont want to lose.
git merge feature1 - while merging we should always be in the destination branch and do the operation. It merges feature1 branch code changes to master branch code (in this case)
git diff --cached - cached ask git to compare the repo to the staging area.
git cherry-pick 6fa4324 - I will add only that one bug fix with commit hash 6fa4324
git push origin v1.0_fixes - It creates new branch v1.0_fixes in github and push the changes into it. Refresh github and you can see that the new branch would be created with pushed changes
git push origin v1.0_fixes:v1.0_fixes_remoteBranch - If we want to name the remote branch name differently rather than using the same local branch name, we can use colon (:) and specify the name of that remote branch. Here v1.0_fixes is the local branch name and v1.0_fixes_remoteBranch is the remote branch name.
If we want to delete the remote branch then we no need to add the local branch name in the command. See below command
git push origin :v1.0_fixes_remoteBranch - It deletes the remote branch v1.0_fixes_remoteBranch from github
So finally we are done with Git Fundamentals course. Hope you enjoyed the tutorial. Please post comments about unclear parts.
Happy Learning!!!!
This post gives you the introduction to the GIT version control system.
A brief history of version control
First generationThe very first version control system were developed in early 70's and operated on a single file and had no networking support.These were the systems such as SCCS and RCS. They are operated on a single file so that you will have a file such as foo.c and have multiple versions of that file. But there was no correspondence between different files within the repository. There was no notion that version 1.1 of foo.c work with version 1.1 of bar.c. It could be arbitrary. So we only had single files. This lead to the innovation of having a multi file system or the second generation.
Second Generation
This is typified by centralized version control system such CVS, VSS, SVN, TFS and Preforce. All of these are multi files centralized system so that you can checkout into a working copy on your local system, all of the files necessary for particular version of a repository.
Third Generation
Along came the third generation which are the Distributed Version Control Systems such as GIT, Hg,BitKeeper and Bazaar. These work on ChangeSets. These ChangeSets can be shipped around and both client and servers can have the entire repository present which allows us to do the interesting things.
If you want to read more about the history of version control, refer to the article
http://www.ericsink.com/vcbe/html/history_of_version_control.html
Advantages of DVCs
Some of the advantages of DVCs over the centralized one is the ability to have different topologies.
Different Topologies
1) If we want to use Centralized model, we still can by having the developers push their changes to central repository. This is commonly done in enterprise environments.
2) we can also use Hierarchial model. It has developers pushing their changes to sub-system based repositories and those sub-system based repositories are periodically merged into a main repository.
This is done in Linux kernel development because linux kernel is very large. There are seperate sub-system repositories like graphics, networking file systems and other portions of linux kernel. those sub-system repositories are periodically merged with main linux kernel so that development can continue on its way
3) We can also use a Distributed model where developers push their changes to their own repository and the project maintainers pull changes to official repository if they deemed valuable. This is very common in open source projects on GitHUB where if we want to contribute changes, you can fork main repository, make your changes and issue a pull request to the project maintainer.
Another advantage of DVC's is backups are extreamly easy. A backup is simply the clone of repository. So if something happens to your main server, simply standup the other server and clone the repository to it.
About Git
Git was created by Linus Torvalds, who also created Linux. Git creation was prompted by Linux-BitKeeper separation. BitKeeper is a commercial DVCs that is used by Linux kernel team from 2002 to 2005. When BitKeeper decided to stop supplying the linux kernel team with free licenses of BitKeeper, Linux started Git project in 2005 to create their own DVCs. It is written in Perl and C and runs on wide variety of operating systems including Linux, Mac OS 10, windows and many other commonly used operating systems available today.
Its main design goals include Seed, simplicity, Strong branching and merging support, a fully Distributed nature and to scale well for larger projects. Remember this was designed to be used on linux kernel which is a very large piece of software
Installing Git on Windows
Now let see how to install Git on windows
msysGit (http://msysgit.github.com)
Go to the website and click on Downloads link. Download the latest version of git and launch the installer. Now Git setup wizard will be opened. Go through some general setup information of your own choice. I am only discussing about some important setup information. If you see below picture, if you want 'Windows explore integration', i would recommend using Git extensions. Stay away from Tortoise Git as that is older project and much more closely mimics Tortoise SVN and does not explore full power of Git. Leave the rest of the options as is.

Clicking on Next to Next button, we see the below wizard. This is one the important menu item. By default it is the first option 'Git bash'. But if we want to include unix tools on windows command prompt, chose the last option. It will only replace windows find commands with more powerful unix commands. So if you can choose according to your interest.

By default Git only have line feeds(LF) in the repository. In windows we use both Character returns and line feeds to know line endings. Some people advocate 'checkout as-is, commit as-is', so your repository will have character return line feeds and it really depends on whom you are sharing with. If the project is cross-platform project which is going to build on Unix, Mac and windows, we should chose the first option. If you are working on windows only project, chose the last option.

Clicking on Next, will install git. And immediatly Windows Powershell will be opened.
git --version - Shows the version of the Git installed.
git init - It creates a repository test which assures me that git is working on the system

Configuring Git
Now the git is installed on system and we will see how we configure them. Git provides three different configuration stores.
1) System level configuration
It is stored in /etc/gitconfig or C:\Program Files(x86)\Git\etc\gitconfig
This git configuration is applied to the entire computer that is installed on and you can access it using
git config --system
2) User level configuration
The second level is user level. We can access it using git config --global. It's global for a particular user and is stored in user home directory in a file called .gitconfig
3) Repository level configuration
You access this by using git config without any specifier and is stored in .git/config file in each repo.
How to configure Git
Let's see how we configure Git. It is not very common to modify system level configuration file but much more common to modify global/user level config and repository config file. Let's try the below commands
git config --global --list
Initially it gives 'Unable to read config file; No such file'
Now we try to add some info to the global or user level config file
git config --global user.name "Malathi Boggavarapu"
git config --global user.email "malathiboggavarapu@gmail.com"
git config --global --list - It shows the global config file that was created with above info.
cat ~/.gitconfig - shows the content of file that was created just now.
git config --global core.editor - The core editor is the default editor that you want to use when editing commit messages or viewing diffs and other pieces of information from Git. If you are EMACS user, you can use emacs or vim user, you can use vim or Notepad++, Notepad.
git config --global help.autocorrect 1
What autocorrect = 1 does is, if you go to your project directory and try git statsu and i misspell it. With autocorrect, it will do a fussy match on that command name and guess what you want to use instead. By setting it to 1, it waits for 0.1 seconds before it actually executing commands. If you set autocorrect to 0, it does not do auto-correcting and if you set to higher number then it will wait for that many tens of milliseconds before performing that action. So i found it very useful especially when you are typing quickly , if you make minor spelling mistake in git command, it will use fussy match to determine which command that you want to use.
git config --global color.ui auto
What auto will do is, it will use colors to show lot of git information. So when we are doing diffs or when we are showing status, it will colours the output.By setting it to auto, it is going to detect whether it is running within a script. If it is running within a script, it will not put color and put escape sequences so that logs are easier to parse. But if it is detected that as running in the terminal, it will be put the escape codes to colorize the output.
git config --global core.autocrlf true|false|input
true - convert CRLF to LF. So when we commit to repository, it will change CRLF combination which is used typically in windows into solely a LF which is then stored in a repository. when you check those files out, it will convert those text files back. It will only perform the actions on text files not on binary files. So it is not going to corrupt binary files.
false - Do nothing. That is commit CRLF to repository and store them there and don't do anything when you pull them back out. If you are only doing Windows development using Git then this might be the option but if you are doing cross platform development, you will end up having CRLF in your repo which will then endup checked out onto other platforms like linux, BSD and Mac OS X which don't generally use CRLF.
input - convert CRLF to LF when you put it into the repo but don't do any conversion on the back out.
So to summarize, on windows, we can use the option true, on Mac or Linux we can use input
So to check the result of all these configuration options we added to the gitconfig file until now, do the below commands.
git config --global --list to see all of the options
cat ~/.gitconfig - Will show the actual contents of the file
If you go to the project repository folder, you will find .git\config file.
cat .git/config
It specifies all the information for the repository. See below for example.

Now if we add a username to the config file, it will override the existing user name
git config user.name "Malathi"
git config --list - you can see that user.name will be overriden to "Malathi".
So these config sources are hierarchial.The user level one overrides any system level settings and repo level one overrides user or global level settings. So if you want to change CRLF just for the repository you can do using git config core.autocrlf true. And you can remove something into a gitconfig, use git config --unset core.autocrlf
You can also simply edit, for example vim .git/config - it will open the file then and there and you can just edit the file as you like.
Working locally with Git
Creating a local repository, adding files and committing changes
I have an empty directory GitFundamentals which i would like to change to local git repository.
Let me explain the commands in the below image so that it would be easy to understand.

git init - It creates .git directory which contains a repository and all of its metadata. I can add file to this repository by echoing "Hello, Git" to a README.txt file.
echo "Hello, Git" > README.txt
git status - Tells me that README.txt is an untracked file and git does not have it in repo yet.
Try adding the file to staging area using git add README.txt
Now again try git status. Git now notices that the file is a new file and is staged to be added to a repository which i can do by running git commit
git commit brings up the default text editor where you can add commit message.
git log - You can see the commits that are done in the repo. You can see Author, date information and also the commit sha. Git identifies the commits by the sha1 hash of the commit.
update the README.txt file by adding a second line "Hello, again"
git add -u - You can add all modified files to the repo.
git commit -m "Updated README.txt" - Commit a file with commit message inline.
git diff --stat --cached origin/master - It will show the files that need to be pushed.
Viewing history and diffs
git log - It shows the two commits in Git repo which are listed in reverse chronological order. So the more recent commits are at the top and latest commits are at the bottom. If you notice the below picture, it shows commit hashes too.

If i want to find what is changed between these two commits, i can do as follows
git diff dd6819..a15ec6 - Note that the "Hello, again" has been added (in the above picture)
So always working with sha1 hashes can be difficult so Git provides easy way of specifying these things. So we can also do it in easy way as below
git diff HEAD~1..HEAD
The latest commit is known as HEAD, i can also go back from HEAD by using ~1. The above command shows the differences between the latest commit and first commit as per our example
We can also specify it in more easy way using git diff HEAD~..
Let's add few more files now using touch command.
touch file1.txt file2.txt
git add -u - Going to add all updated files to staging area. Git has a notion of this staging area which of the files or changes that are going to add in next commit. Remember that -u option only adds the updated files to the staging area, that means files that has been updated or deleted.
git add -A - This A option adds all files including untracked ones. You should be careful while using this option to make sure that you are not accidentally adding files that you are not intended to.
In our example, it will add file1.txt and file2.txt files to the staging area.
You can also delete and rename files and follow the same sequence of commands such as add and commit to add to the staging area and commit the files.
Undoing changes to the working copy
If i want to undo the changes of a file, simply do git checkout [filename] to pull that out of the repo. By default it grabs the HEAD version. You can checkout files form the repo inorder to cleanup or revert changes that you made by mistake or changes that are a bad idea.
git reset --hard - Reset the working copy back to the HEAD.
git clean -n - It shows the files that woudl be removed.
git clean -f - Removes the temporary files from the repo.
Its easy way to clean up the working copy.
Ignoring files with .gitignore
Now let's say i do have something like log directory which contain some log files. Logs are constantly changing as the application runs and i dont want to commit these log files to my repo. So git provides .gitignore file. Open the file and add info to it.
/logs/*.txt
/logs/*.log
/logs
you can add any format but make sure tha paths are relative to your repository.
Working remotly with Git
Let's look at cloning our remote repo to our local machine. In our example i use jquery repository on github.
git clone https://github.com/jquery/jquery.git
This is going to download the entire history of the project, all of the commits that have been made to the jquery repo. You can use git log command to see the commits that have been made to the project. To see more condensed version, use git log --oneline. You can see commit per line.
Basic repository statistics
git log --online | wc -l - If we want to know how many commits exists in the repo, you can use word count (wc) along with -l (alphabet l).
git log --online --graph - Provides graph on left hand side showing difft branches and merges that happened. So we can see how the history of the project is changed. If you see the below picture, on the left hand side, you see graph which indicates different branches and merges for various request that were made.

git shortlog - It lists all the authors and commit messages for each of them. It also provides number of commits each author has made. See below.

git shortlog -sne
s -> If i don't want to have individual commit messages and want summary,
n -> orders numerically by number of commits.
e -> include users email addresses.
See the below example when we use options sne to the shortlog. The first column is number of commits that were made by the user and second column is the user name and thrid column is their corresponding email address.

Viewing commits
We can also take a look at any of the commits that were made.
git show HEAD - what is the last commit made for the query project.
git show [commit hash] - It shows all the changes that were made under the particulat commit by identifying using commit hash.
git remote - It shows that we have got one remote called origin. origin is the git default name from where the source come from.
git remote -v - It shows both the urls for fetch and push for that particular remote.
See the below picture

Viewing Branches and Tags
git branch - You can view all branches in your repository.
git branch -r - Display remote branches
Branches are often used for temporary working copies, to seperate main line development from bug fixes.
git tag - Display tags. These are stable points and known points in your codebase where you can often tag versions.
Fetching from a Remote
The remote repository is automatically added when we clone a repository for example from GITHUB but if i have local repo and i want to add a remote destination to it, i can use the below command to do it.
git remote add origin https://github.com/....
origin can be anything, i had chosen some arbitrary name here. So if someone sends a pull request, you can add their public repository and then pull their changes into your working local copy to examine. So you can have multiple remotes and it is done commonly in git inorder to evaluate patches or pull requests that have been made to your project. Now that remote has been added. I can do the following command
git fetch - Will pull down any changes from that remote repo. We can run as many times as we want. If we have multiple remotes, i can specify from which remote to fetch from.
Example : git fetch origin
git log origin/master - origin/master is the name of the remote branch. It shows all the changes that were committed into the repository.
If we have some new commits in the repo and does not exist in your local working copy, then do a merge operation. See below.
git merge origin/master
We will discuss more about merge later.
Pulling from a Remote
If i do git branch -r, i can see that remote branch origin/master that i just merged from (as said above)
git fetch; git merge origin/master - We can specify multiple commands at the same time. This command will fetch from rempote repo and do merge the changes to local repo.
git branch --set-upstream master origin/master - Setting up upstream branch is introduced in Git 1,7. Upstream tracking branch is basically what branch remotely does my local branch nearer. master is my master branch (local one) and origin/master is the branch of remote repo. Once i set this remote tracking branch i can do the following command to pull out the changes from the remote repo to local repo.
git pull - It is the shortest form of command git fetch; git merge origin/master. It pulls any changes down to local repo. If i do not want to use upstream branch as said above, i can simply use git pull origin master where origin master is the remote branch.
Pushing to a Remote

If we look at first command git commit -am "Sharing is easy", we are committing changes of a file to local repository and we want to push the changes to the remote repository. Now when we do git push, it ask for username and password to access github. Instead of doing this way, we are going to follow a slightly different approach here.
We do remove remote origin using git remote rm origin and add it using the ssh version of the url. The advantage of the ssh version is that it is going to use my ssh key to authenticate with github. Now if i do git push, it is not going to prompt for the password but it just push the changes to the github.
So if you are pushing the changes back up to the github repository, it is easier to use ssh url rather than http url. http require username and password whereas the ssh version can use your ssh key to do the authentication for you.
Creating and Veifying tags
Lets look at tagging the repo. We can tag a repo by using the below commands
git tag v1.0 - v1.0 is the tag name and it is an unsigned tag.
git tag - It shows the tags that were created
git tag -a v1.0_with_message - It will annotate or message to associate with a tag.
git tag -s v1.0_signed - We can sign a tag using this command.
We can also verify the tags. To verify the created tags we use the following commands. See the picture.

The above picture is very clear. For the programmer there is no need to explain further i believe. So if you are exposing a public project and you want to ensure that certain commits can be verified and in other words that it is an official commit, you can then use signing to identify the commits.
Pushing tags to a Remote
To push tags, we need to perform git push --tags, to create new tags in github repository. You can go to github and check your repository -> tags tab to see the tags that were pushed by you.
Branching, Merging and Rebasing with Git
First we look at how to visualize the branches. We have already discussed about the command git log --graph --oneline which gives us the list of commits on the current branch using a graph on left hand side. Now we are going to add some more options to add the visualizers for our branches.
git log --graph --online --all --decorate -> all allows us to visualize all the branches rather than the current branch and decorate applies any labels to the commits such as HEAD, tags, remote branches and the local branches.
So typing this out everytime is cumbersome. So we can add an alias for this as below
git config --global alias.lga "log --graph --oneline --all --decorate".
git lga - It will do exactly what the above command does git log --graph --online --all --decorate
See the below picture to understand easily.

Creating local branches
git branch feature1 - It will create a branch with name feature1
git checkout feature1 - We will be switched to the branch feature1
git branch fix1 974b56a - It will create a branch based on the commit id. More frequently we will be creating fixed branches from the tags or local branches.
Renaming and deleting branches
git branch -m fix1 Bug1234 - It will rename the branch fix1 to Bug1234
git branch -D Bug1234 - It will delete the branch Bug1234
git checkout -b feature2 - It will create a branch and switch to it automatically if you are in a different branch
Recovering deleted commits
For suppose we delete a branch Bug1234 and we want to recover it. We follow the below apprach to recover a deleted branchgit reflog - This is a log of all references where HEAD is pointed. We can actually see where the branch Bug1234 is created and use corresponding sha1 to recover the branch
git branch Bug1234 5a78c8b - It will create a branch Bug1234 using the commit hash.
git checkout Bug1234 - You can see that the branch Bug1234 is recovered.
Stashing changes
Suppose you made some code changes in the branch feature1 and someone comes in with a bug report and they want to fix them right away. But the changes that were made are not ready for checkin and i dont want to lose them. I can save this work by using git stash. Now if you do git status, you can see pending changes of working copy have been rollbacked.git stash list - You can see the changes are in git stash. It is a holding area for your pending chnages.
git stash apply - It will pull those changes back that were saved using git stash command. You can check the files and see the changes were re-applied again.
git stash pop - It pops the top item of the stash and applies it to my current working copy. It removes the top item from the stash list.
git stash drop - It will drop the reference to that stash
git stash branch feature2_additional - Its going to createthe new branch, check it out and apply the stash to it.
Stashing is very useful way for as temporary holding area for changes that are not ready to commit to a branch and you dont want to lose.
Merging branches
git merge feature1 - while merging we should always be in the destination branch and do the operation. It merges feature1 branch code changes to master branch code (in this case)
git diff --cached - cached ask git to compare the repo to the staging area.
Cherry-picking changes
For suppose you made two bug fixes in your branch and want to merge only one bug fix to the master branch then we can use the following commandgit cherry-pick 6fa4324 - I will add only that one bug fix with commit hash 6fa4324
git push origin v1.0_fixes - It creates new branch v1.0_fixes in github and push the changes into it. Refresh github and you can see that the new branch would be created with pushed changes
git push origin v1.0_fixes:v1.0_fixes_remoteBranch - If we want to name the remote branch name differently rather than using the same local branch name, we can use colon (:) and specify the name of that remote branch. Here v1.0_fixes is the local branch name and v1.0_fixes_remoteBranch is the remote branch name.
If we want to delete the remote branch then we no need to add the local branch name in the command. See below command
git push origin :v1.0_fixes_remoteBranch - It deletes the remote branch v1.0_fixes_remoteBranch from github
So finally we are done with Git Fundamentals course. Hope you enjoyed the tutorial. Please post comments about unclear parts.
Happy Learning!!!!

Comments
Post a Comment