Git - Branching, Merging, Rebasing and Cherry-picking
Hi, I am Malathi Boggavarapu and welcome to my blog.
This tutorial describes about Branching, Merging and Rebasing with Git and also about Git stashing, Cherry-picking. I have a seperate post "Git Fundamentals" in my blog which explains everything about Git but i had broken them down to smaller sections to make it easy for everyone to follow. This post will only introduce you to Git.
So let's get started.
Branching, Merging and Rebasing with Git
First we look at how to visualize the branches. We have already discussed about the command git log --graph --oneline which gives us the list of commits on the current branch using a graph on left hand side. Now we are going to add some more options to add the visualizers for our branches.
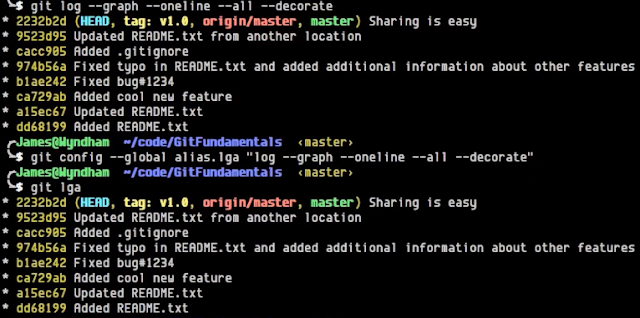
git log --graph --online --all --decorate -> all allows us to visualize all the branches rather than the current branch and decorate applies any labels to the commits such as HEAD, tags, remote branches and the local branches.
So typing this out everytime is cumbersome. So we can add an alias for this as below
git config --global alias.lga "log --graph --oneline --all --decorate".
git lga - It will do exactly what the above command does git log --graph --online --all --decorate
See the below picture to understand easily.
Creating local branches
git branch feature1 - It will create a branch with name feature1
git checkout feature1 - We will be switched to the branch feature1
git branch fix1 974b56a - It will create a branch based on the commit id. More frequently we will be creating fixed branches from the tags or local branches.
Renaming and deleting branches
git branch -m fix1 Bug1234 - It will rename the branch fix1 to Bug1234
git branch -D Bug1234 - It will delete the branch Bug1234
git checkout -b feature2 - It will create a branch and switch to it automatically if you are in a different branch
Recovering deleted commits
For suppose we delete a branch Bug1234 and we want to recover it. We follow the below apprach to recover a deleted branchgit reflog - This is a log of all references where HEAD is pointed. We can actually see where the branch Bug1234 is created and use corresponding sha1 to recover the branch
git branch Bug1234 5a78c8b - It will create a branch Bug1234 using the commit hash.
git checkout Bug1234 - You can see that the branch Bug1234 is recovered.
Stashing changes
Suppose you made some code changes in the branch feature1 and someone comes in with a bug report and they want to fix them right away. But the changes that were made are not ready for checkin and i dont want to lose them. I can save this work by using git stash. Now if you do git status, you can see pending changes of working copy have been rollbacked.git stash list - You can see the changes are in git stash. It is a holding area for your pending chnages.
git stash apply - It will pull those changes back that were saved using git stash command. You can check the files and see the changes were re-applied again.
git stash pop - It pops the top item of the stash and applies it to my current working copy. It removes the top item from the stash list.
git stash drop - It will drop the reference to that stash
git stash branch feature2_additional - Its going to createthe new branch, check it out and apply the stash to it.
Stashing is very useful way for as temporary holding area for changes that are not ready to commit to a branch and you dont want to lose.
Merging branches
git merge feature1 - while merging we should always be in the destination branch and do the operation. It merges feature1 branch code changes to master branch code (in this case)
git diff --cached - cached ask git to compare the repo to the staging area.
Cherry-picking changes
For suppose you made two bug fixes in your branch and want to merge only one bug fix to the master branch then we can use the following commandgit cherry-pick 6fa4324 - I will add only that one bug fix with commit hash 6fa4324
git push origin v1.0_fixes - It creates new branch v1.0_fixes in github and push the changes into it. Refresh github and you can see that the new branch would be created with pushed changes
git push origin v1.0_fixes:v1.0_fixes_remoteBranch - If we want to name the remote branch name differently rather than using the same local branch name, we can use colon (:) and specify the name of that remote branch. Here v1.0_fixes is the local branch name and v1.0_fixes_remoteBranch is the remote branch name.
If we want to delete the remote branch then we no need to add the local branch name in the command. See below command
git push origin :v1.0_fixes_remoteBranch - It deletes the remote branch v1.0_fixes_remoteBranch from github
So we came to the end of the session. Hope it is helpful. Please post your comments and let me know your questions and valuable inputs.
Follow my other posts on Git which were mentioned below
Brief History of Version Control Systems, DVCS Advantages and Git Installation
Configuring Git in your computer
Working locally with Git
How to Git clone your remote repository
Git Fetching, Pulling from Remote repository and Pushing to Remote repository
Git - Creating, Verifying tags and Pushing to Remote repository
Git - Branching, Merging, Rebasing and Cherry-picking
Happy Learning!!!


Comments
Post a Comment