Dynamic Configuration of Distributed Applications using Spring Cloud Netflix Project
Hi, I am Malathi Boggavarapu working at Volvo Group and i live in Gothenburg, Sweden. I have been working on Java since several years and had vast experience and knowledge across various technologies.
In my previous post of 'Developing MicroServices using Spring Cloud Netflix API', we learnt how to develop MicroServices using Spring Cloud Netflix API. In this section i am going to explain how to build Spring Cloud Configuration Server and Client and the real purpose of using them.
You will find all the exercise files in my GitHub account regarding my previous post 'Developing MicroServices using Spring Cloud Netflix API' and also for this post.
Clone my below GitHub project to your local machine and try out the exercise files.
So let's get started. This tutorial describes about how we manage application configuration in distributed system like a cloud. First and foremost we will learn about the difference between managing configuration in a cloud-native application and non-cloud native application. Here we refer cloud native application as a Distributed application (Ex: MicroServices) and non-cloud native application as Non-distributed application.
Now go to src/main/resources and create a bootstrap.properties and the following to it.
In my previous post of 'Developing MicroServices using Spring Cloud Netflix API', we learnt how to develop MicroServices using Spring Cloud Netflix API. In this section i am going to explain how to build Spring Cloud Configuration Server and Client and the real purpose of using them.
You will find all the exercise files in my GitHub account regarding my previous post 'Developing MicroServices using Spring Cloud Netflix API' and also for this post.
Clone my below GitHub project to your local machine and try out the exercise files.
/SpringCloud
So let's get started. This tutorial describes about how we manage application configuration in distributed system like a cloud. First and foremost we will learn about the difference between managing configuration in a cloud-native application and non-cloud native application. Here we refer cloud native application as a Distributed application (Ex: MicroServices) and non-cloud native application as Non-distributed application.
So if we look into non-distributed application, we will end up with one or more configuration files and have a one-to-one relation between a system and a configuration. But in distributed system there are many many configuration files because there are many many systems that make up one system as a whole. For instance if you are using MicroServices, there would be many Services and each Service will end up with a Configuration file.
Now let's look at the issues that we face with typical configuration management. The first thing is the issue with Deployments. When we change any configuration, we have to do a new deployment for the configuration to be updated and restart the application. For instance if you want to make a temporary change to the logging level in your application to debug an issue. Then making a new deployment and restarting the whole application is pretty heavy process just for a temporary and small change. The another way to make configuration changes to application is via PUSH. Pushing configuration in cloud environment is not dynamic. It should know where the configuration should be pushed to. But in cloud, application instances will go and come at any given point of time. I mean that if we take MicroService architecture, Services would be scaled Up and Down depending on the traffic or load on the application. In that case, there is a risk of missing the configuration change to the newly created instance. So what about Pull mechanism if Push does not work? Well, it doesn't work either. Pull works on the basis of pulling the configuration changes periodically by the application. It follows polling technique where the application checks for every N number of minutes to see whether there are any configuration changes. But this introduces latency from the time that we change our configuration to the time that it takes effect.
So the answer to the above problems is a Configuration Server. The Configuration server is a dynamic and centralized Key, Value store. It also provides Auditing, Versioning and Cryptography support where you can encrypt and decrypt the sensitive configuration values.
Spring Cloud Config Server is the implementation of Configuration Server. So now let's take a deep dive into the features that Spring Cloud Config Server provides.
- First of all we should learn that the configuration server is just an another web application and provides REST interface for accessing configuration files. So if we setup configuration files and name them appropriatly and tell the configuration server where they are located then it will serve them to you.
- It supports various output formats such as JSON(default), Properties and YAML.
- Configuration Server does not need a database to store the files but instead it has support for reading and retrieving configuration files stored in various backend stores such as Git (default), SVN and so on.
- It also have a notion of Configuration scopes. It means that you can define global configurations that applies to all applications as well as application-specific, profile specific configurations.
Now let's take a look at how we configure Spring Cloud Config Server in our application. Well, it begins with Pom.xml. We should add some dependencies for that. So in pom.xml we should add the following information.
<dependency>
<groupId>org.springframework.cloud</groupId>
<artifactId>spring-cloud-config-server</artifactId>
</dependency>
<dependencyManagement>
<dependencies>
<dependency>
<groupId>org.springframework.cloud</groupId>
<artifactId>spring-cloud-dependencies</artifactId>
<version>Camden.SR2</version>
<type>pom</type>
<scope>import</scope>
</dependency>
</dependencies>
</dependencyManagement>
Next create a folder to store all of your configuration that you want your configuration server to serve up. In that folder you can create an application.properties file or application.yml file but this is optional. This file is for global configuration that should be applied to all the applications, not just for specific application. For instance if you want to store database configuration that should be accessed by all the applications then you can use this global configuration file.
Next you add application and profile specific configuration files in the folder and it could be in properties or yml format. The naming pattern for the file name should be application-profile.extension. Here application refers to your application name and profile is the Spring profile such as prod, dev and stage. If we do not use Spring profile, we can omit it out and just use application name.extension.
For example, if your application name is SpringCloudTest then it should be named after SpringCloudTest.properties or SpringCloudTest.yml.
Next you would run git init within the folder where you have all your configuration files. By default Git is used as default backend storage. You can add configuration files and commit them to the repository using git.
All the above steps explain the way how we setup a Spring Cloud config server using pom.xml and also about Configuration files which will be served by the Config Server. Now we have to look after configuring the Configuration Server itself. Please don't confuse with the configuration files that configuration server is serving. This is the application configuration for the actual configuration server. In Config server application.properties file, you add the following information
server.port = 8888
spring.cloud.config.server.git.uri=<URI to git repo>
You should add the port where the config server runs at and also the Git URI where all of your configuration files are stored inorder for the Config server to access and serve. If you upload configuration files to Git repository, URI should be the clone URI of your repository.
The next step is to add the annotation @EnableConfigServer to your main application class. And if you want your Configuration Server to be discovered by the Service Discovery, you can add the Eureka Client dependencies, configure the service discovery url and add the @EnableDiscoveryClient annotation and then Clients would be able to discover the Configuration Server.
Expand the project structure and navigate to src/main/java and there you will find Main application class. Then add @EnableConfigServer annotation, save and close the file. Later open application.properites file and add the following properties to it. First you add the default port of the config server which is set to 8888 and add the git repository URI where all of your configuration files are stored. In our example i have a git repository uri where i have some configuration files. Please go to my git uri and check the files.
server.port = 8888
spring.cloud.config.server.git.uri=https://github.com/MalathiBoggavarapu/SpringCloudConfigRepo.git
My configuration files are as follows. In our case the application name for client config (which access the configuration from config server) is client-config-app, hence the property files are named after config-client-app-prod.properties and also config-client-app.properties which you can see below.
application.properties
#put all global configuration here
some.property=global
some.other.property=global
config-client-app-prod.properties
#put application+profile-specific config here (app-name: client-config-app) (profile name: prod)
some.other.property=profile specific value
some.property=profile specific value
config-client-app.properties
#put application-specific config here (app-name: client-config-app)
some.property=app specific overriden value
Now right click on the main application class which is located under src/main/java and annotated as @SpringBootApplication. Choose Run As -> Spring Boot app so that the application starts. Now go to the browser and hit some of the REST endpoints as shown below.
Please note:
config-client-app-prod.properties takes precedence over the config-client-app.properties and config-client-app.properties takes precedence over the application.properties. I means that the it follows the following precedence
config-client-app-prod.properties (profile scope)
config-client-app.properties (application scope)
application.properties (global scope)
So if we hit the following REST endpoint
http://localhost:8888/config-client-app/default
Here default is the default profile. It means that this url doesn't show properties from profile prod. Try the url and under the propertySources you will see how the property files take precedence one over the other as said above
Now we hit another REST endpoint by specifying the profile prod.
http://localhost:8888/config-client-app/prod
Now it shows all the application properties according to the precedence as said above
http://localhost:8888/config-client-app.properties
Please try it and check. It applies all the property sources and display the result according to the precedence as said above.
http://localhost:8888/config-client-app.yml
You can also see the properties in the YAML format. Instead of .properties in the url, replace it with yml as show above.
Until now we have seen that how Spring cloud config server is setup. Now we look at Config Client. Config client is responsible for bootstrapping and fetching application configuration from the Config server. When a spring application starts up, it needs to resolve it's property sources and it needs to do that on very early in the startup process. Resolving property sources means, all the placeholders in property sources should have some value in place . Since the configuration is on the config server, it means config client needs to fetch application configuration before the Spring ApplicationContext has even technically started. If we wait until the application is fully started, it is too late in the process.
There are two different ways to get the config client to bootstrap the application properties. Both use a file called boostrap.properties or boostrap.yml.
The first way is Config First. You do that by configuring boostrap.properties or bootstrap.yml that has the application name and also url to the config server.
The second way is Discovery First. It uses ServiceDiscovery. You need to configure the boostrap.properties or bootstrap.yml to have the application name and then the location of the ServiceDiscovery server and then the Config Client use that to find the config server to fecth the configuration.
Now let's look at the issues that we face with typical configuration management. The first thing is the issue with Deployments. When we change any configuration, we have to do a new deployment for the configuration to be updated and restart the application. For instance if you want to make a temporary change to the logging level in your application to debug an issue. Then making a new deployment and restarting the whole application is pretty heavy process just for a temporary and small change. The another way to make configuration changes to application is via PUSH. Pushing configuration in cloud environment is not dynamic. It should know where the configuration should be pushed to. But in cloud, application instances will go and come at any given point of time. I mean that if we take MicroService architecture, Services would be scaled Up and Down depending on the traffic or load on the application. In that case, there is a risk of missing the configuration change to the newly created instance. So what about Pull mechanism if Push does not work? Well, it doesn't work either. Pull works on the basis of pulling the configuration changes periodically by the application. It follows polling technique where the application checks for every N number of minutes to see whether there are any configuration changes. But this introduces latency from the time that we change our configuration to the time that it takes effect.
So the answer to the above problems is a Configuration Server. The Configuration server is a dynamic and centralized Key, Value store. It also provides Auditing, Versioning and Cryptography support where you can encrypt and decrypt the sensitive configuration values.
Spring Cloud Config Server is the implementation of Configuration Server. So now let's take a deep dive into the features that Spring Cloud Config Server provides.
- First of all we should learn that the configuration server is just an another web application and provides REST interface for accessing configuration files. So if we setup configuration files and name them appropriatly and tell the configuration server where they are located then it will serve them to you.
- It supports various output formats such as JSON(default), Properties and YAML.
- Configuration Server does not need a database to store the files but instead it has support for reading and retrieving configuration files stored in various backend stores such as Git (default), SVN and so on.
- It also have a notion of Configuration scopes. It means that you can define global configurations that applies to all applications as well as application-specific, profile specific configurations.
Now let's take a look at how we configure Spring Cloud Config Server in our application. Well, it begins with Pom.xml. We should add some dependencies for that. So in pom.xml we should add the following information.
<dependency>
<groupId>org.springframework.cloud</groupId>
<artifactId>spring-cloud-config-server</artifactId>
</dependency>
<dependencyManagement>
<dependencies>
<dependency>
<groupId>org.springframework.cloud</groupId>
<artifactId>spring-cloud-dependencies</artifactId>
<version>Camden.SR2</version>
<type>pom</type>
<scope>import</scope>
</dependency>
</dependencies>
</dependencyManagement>
Next create a folder to store all of your configuration that you want your configuration server to serve up. In that folder you can create an application.properties file or application.yml file but this is optional. This file is for global configuration that should be applied to all the applications, not just for specific application. For instance if you want to store database configuration that should be accessed by all the applications then you can use this global configuration file.
Next you add application and profile specific configuration files in the folder and it could be in properties or yml format. The naming pattern for the file name should be application-profile.extension. Here application refers to your application name and profile is the Spring profile such as prod, dev and stage. If we do not use Spring profile, we can omit it out and just use application name.extension.
For example, if your application name is SpringCloudTest then it should be named after SpringCloudTest.properties or SpringCloudTest.yml.
Next you would run git init within the folder where you have all your configuration files. By default Git is used as default backend storage. You can add configuration files and commit them to the repository using git.
All the above steps explain the way how we setup a Spring Cloud config server using pom.xml and also about Configuration files which will be served by the Config Server. Now we have to look after configuring the Configuration Server itself. Please don't confuse with the configuration files that configuration server is serving. This is the application configuration for the actual configuration server. In Config server application.properties file, you add the following information
server.port = 8888
spring.cloud.config.server.git.uri=<URI to git repo>
You should add the port where the config server runs at and also the Git URI where all of your configuration files are stored inorder for the Config server to access and serve. If you upload configuration files to Git repository, URI should be the clone URI of your repository.
The next step is to add the annotation @EnableConfigServer to your main application class. And if you want your Configuration Server to be discovered by the Service Discovery, you can add the Eureka Client dependencies, configure the service discovery url and add the @EnableDiscoveryClient annotation and then Clients would be able to discover the Configuration Server.
Setting up a Configuration Server
Below are the jargons i use to refer through this section.
Application name : config-server
Main application class: ConfigServerApplication
Please Note: The Main application class and application.properties were created automatically when you generate or create a project using Spring Initializr (start.spring.io). The class name is defined depending on the artifactId you give while you are creating the project. What i mean by Main application class? This is the class which is annotated with @SpringBootApplication and is used to start your application server.
In this demo we will build and startup our own config server. So head over to start.spring.io. Fill in Group and Artifact Id and add required dependencies such as Eureka Server and Eureka Discovery to register itself to Discovery Server so that config clients will find it. We also add Actuator dependency. Go ahead and click Generate Project so that a ZIP file will be downloaded and just unzip it and import into your IDE. See below.
In this demo we will build and startup our own config server. So head over to start.spring.io. Fill in Group and Artifact Id and add required dependencies such as Eureka Server and Eureka Discovery to register itself to Discovery Server so that config clients will find it. We also add Actuator dependency. Go ahead and click Generate Project so that a ZIP file will be downloaded and just unzip it and import into your IDE. See below.
Group Id : com.mboggavarapu
ArtifactId: config-server
Dependencies: Eureka Discovery, Eureka Server and Actuator
Expand the project structure and navigate to src/main/java and there you will find Main application class. Then add @EnableConfigServer annotation, save and close the file. Later open application.properites file and add the following properties to it. First you add the default port of the config server which is set to 8888 and add the git repository URI where all of your configuration files are stored. In our example i have a git repository uri where i have some configuration files. Please go to my git uri and check the files.
server.port = 8888
spring.cloud.config.server.git.uri=https://github.com/MalathiBoggavarapu/SpringCloudConfigRepo.git
My configuration files are as follows. In our case the application name for client config (which access the configuration from config server) is client-config-app, hence the property files are named after config-client-app-prod.properties and also config-client-app.properties which you can see below.
application.properties
#put all global configuration here
some.property=global
some.other.property=global
config-client-app-prod.properties
#put application+profile-specific config here (app-name: client-config-app) (profile name: prod)
some.other.property=profile specific value
some.property=profile specific value
config-client-app.properties
#put application-specific config here (app-name: client-config-app)
some.property=app specific overriden value
Now right click on the main application class which is located under src/main/java and annotated as @SpringBootApplication. Choose Run As -> Spring Boot app so that the application starts. Now go to the browser and hit some of the REST endpoints as shown below.
Please note:
config-client-app-prod.properties takes precedence over the config-client-app.properties and config-client-app.properties takes precedence over the application.properties. I means that the it follows the following precedence
config-client-app-prod.properties (profile scope)
config-client-app.properties (application scope)
application.properties (global scope)
So if we hit the following REST endpoint
http://localhost:8888/config-client-app/default
Here default is the default profile. It means that this url doesn't show properties from profile prod. Try the url and under the propertySources you will see how the property files take precedence one over the other as said above
Now we hit another REST endpoint by specifying the profile prod.
http://localhost:8888/config-client-app/prod
Now it shows all the application properties according to the precedence as said above
http://localhost:8888/config-client-app.properties
Please try it and check. It applies all the property sources and display the result according to the precedence as said above.
http://localhost:8888/config-client-app.yml
You can also see the properties in the YAML format. Instead of .properties in the url, replace it with yml as show above.
Spring Cloud Config Client
There are two different ways to get the config client to bootstrap the application properties. Both use a file called boostrap.properties or boostrap.yml.
The first way is Config First. You do that by configuring boostrap.properties or bootstrap.yml that has the application name and also url to the config server.
The second way is Discovery First. It uses ServiceDiscovery. You need to configure the boostrap.properties or bootstrap.yml to have the application name and then the location of the ServiceDiscovery server and then the Config Client use that to find the config server to fecth the configuration.
Demo : How to retrieve configuration with Config Client
Below are the jargons i use to refer through this section.
Application name : config-client-app
Main application class: ConfigClientAppApplication
Please Note: The main application class and application.properties were created automatically when you generate or create a project using Spring Initializr (start.spring.io). The class name is defined depending on the artifactId you give while you are creating the project. What i mean by main application class? This is the class which is annotated with @SpringBootApplication and is used to start your application server.
In this demo we will use Config Client to retrieve configuration information from config server (which is described above under section Setting Up a Config Server ) at application startup. So head over to start.spring.io, add the following information. You can change Group Id and ArtifactId as you wish. But i set the below info while creating the project.
Group Id : com.mboggavarapu
ArtifactId: config-client-app
Dependencies: Config Client, Eureka Discovery and Actuator
Click on the Generate Project button, it downloads ZIP file, extract it and import it to your IDE.
You also need DiscoveryServer application running inorder to discover your Configuration server. If you already have it in your system then you are ready to go otherwise please import it from my GitHub repository. If you really want to work on this exercise, you want DiscoveryServer running in your IDE.
You can clone SpringCloud project from my GitHub account MalathiBoggavarapu/SpringCloud. It contains a DiscoveryServer, Service and also a Client.
Now we should make some changes to the Config server application that we created earlier so that it will register itself to the DiscoveryServer. Open your config server application and go to the main application class which contains annotation @SpringBootApplication and add annotation @EnableDiscoveryClient underneath the annotation @EnableConfigServer. Now open up the application.properties file in the Config server application and add the following properties.
spring.application.name=configserver
eureka.client.server-url.defaultZone=http://localhost:8761/eureka
Now come back to config-client-app application and open the Main application class, add @EnableDiscoveryClient annotation and save the file.
Next create a class ConfigClientAppConfiguration class.
@Component
@ConfigurationProperties(prefix="some")
public class ConfigClientAppConfiguration{
private String property;
public String getProperty(){
return property;
}
public void setProperty(){
this.property = property;
}
}
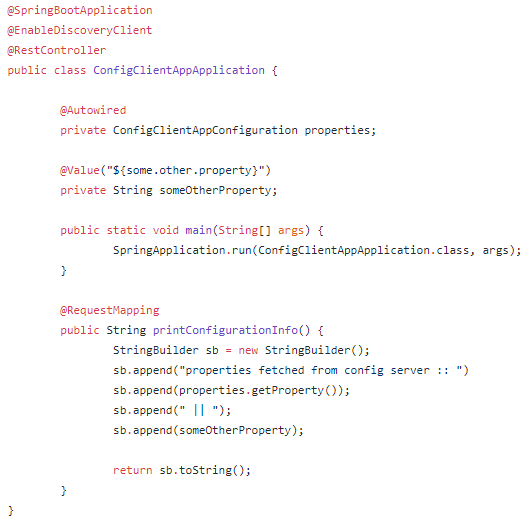
Now head to your ConfigClientAppApplication and autowire ConfigClientAppConfiguration class and also add some properties. See below.

Now go to src/main/resources and create a bootstrap.properties and the following to it.
spring.application.name=config-client-app
spring.cloud.config.discovery.enabled=true // This tells the config client to find config server via ServiceDiscovery
eureka.client.server-url.defaultZone=http://localhost:8761/eureka // Set the location of DiscoveryServer.
Now we are ready to start all the required applications and see the results. First head over to DiscoveryServer and start it. Later start Config Server and Config Client. Now go to the browser and access the url http://localhost:8080/
Now, You will see the output. If you understood all the above concepts, definitly you will understand the output too. No need to explain further. :)
But anyway below is the explanation of the output that you get after accessing the url.
Now, You will see the output. If you understood all the above concepts, definitly you will understand the output too. No need to explain further. :)
But anyway below is the explanation of the output that you get after accessing the url.
What it actually does is, the config client access the configuration files stored in the config server via ServiceDiscovery and displays the output. The property files that were accessed now are config-client-app-properties and application.properties. We created application specific configuration class ConfigClientAppConfiguration, so the some.property value is fetched from property file config-client-app.properties and some.other.property is fetched from global properties file which is application.properties.
Updating Configuration at Runtime
Updating Configuration properties at runtime is really a useful feature of Spring Cloud. It actually refreshes @ConfigurationProperties at runtime so that we no need to restart the application server. Any changes done to the property files will be refreshed and applied automatically without restarting your application server. And any changes in the Logging levels of your application can be refreshed automatically with out the server restart.
Steps to update configuration at runtime
1) Clone your configuration repository where your config server is looking at and make your changes. After that follow the usual Git commands to Add, Commit and Push the changes to the configuration repository .
2) There are several ways that the application gets the configuration information. It would be manual or automatic process.
The first way is Manual. It is acheived by calling refresh endpoint in Spring actuator project. But it should be done for each application that needs this configuration updated.
The second way is combination of Manual and Automatic. All the applications can subscribe to the event and you can call bus/refresh endpoint, then Spring cloud bus would send out the message to all the subscribers indicating that they need to refresh the configuration. But here is one problem. Every application will just go and get configuration regardless of whether the configuration chnages happened for them or not.
The thrid way is similar to the second way with slight changes. Here we hook it up into the VCS like Git so every time you commit, ChangeSet is posted to monitor endpoint and then it determine which application needs the configuration update.
3) After the configuration changes are done, you are ready to work on application directly with out restarting your server. Hurrayyyy!!!!!! It really Amazing!!!!!
So now we try to change the properties in config-client-app.properties. Just go ahead and change the property values and refresh the configuration using the REST enpoint http://localhost:8080/refresh.
To access the REST endpoints there is a tool called Postman. Download and install it by going through the website http://getpostman.com.
So now we try to change the properties in config-client-app.properties. Just go ahead and change the property values and refresh the configuration using the REST enpoint http://localhost:8080/refresh.
It refreshes the updated property files and the updated changes are now available inside the application without out restarting the server. That's really great!! I love this feature.
To access the REST endpoints there is a tool called Postman. Download and install it by going through the website http://getpostman.com.
@RefreshScope
Until now we learnt about the way we refresh @ConfigurationProperties and logging levels of the application. But it does not cover all of the usecases. For instance anything which gets value only at the time of initialization can not be refreshed in the ways that we described above. For example @Bean or @Value will not be automatically refreshed.
Let's take an example. We have a Configuration class which is annotated with @Configuration.
@Configuration
public class ConfigurationEx{
@Bean
public FileService fileService(FileProperties properties){
return new FileService(properties.getConfigValue());
}
}
Please note FileProperties is an another configuration class. After we do refresh configuration in one of the three ways as described at section Steps to update configuration at runtime (possibly we work with thrid way), @Bean will not see the new configuration value. That's because FileService gets it's configuration during initialization phase.
We see one more such example. @Value is not refreshed since FileService class gets its configuration during initialization phase.
@Configuration
public class ConfigurationEx{
@Value("${some.config.value}")
String configValue;
@Bean
public FileService fileService(){
return new FileService(configValue);
}
}
So what's shall we do now?! That's where @RefreshScope come in. so just go ahead and add @RefreshScope annotation to the above classes. See below
@Configuration
@RefreshScope
public class ConfigurationEx{
@Bean
public FileService fileService(FileProperties properties){
return new FileService(properties.getConfigValue());
}
}
@RefreshScope tells Spring to re-initialize @Bean and @Value.
So that's all for this session. Please post your comments below and make the sessions interactive.
Your feedback is more valuable so please provide it. Thanks
Happy Learning!!!!
So that's all for this session. Please post your comments below and make the sessions interactive.
Your feedback is more valuable so please provide it. Thanks
Happy Learning!!!!

Comments
Post a Comment