Learning Git and GitHub in more Practical way
Hi, My name is Malathi Boggavarapu and welcome to my blog. In this section we will see how to create a local and remote repositories using Git and GitHub, Pulling the changes from remote to local repository, Pushing the changes from local to remote repository and also we will go through various Git commands which are very useful while working with the application.
Prerequisites
Git - Latest version
First and foremost we should create a GitHub account. Please do visit github.com and create an account. Later we need to create an SSH key and add it to your GitHub account.
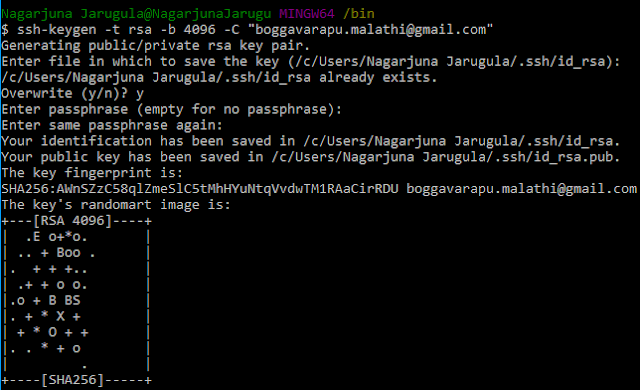
Now go to the ..\Git\bin\, and click on bash. Git bash will be opened. Now we follow few steps to generate SSH key. See the below picture
ssh-keygen -t rsa -b 4096 -C "[Your registered Git email id]"
Using the above command a new SSH key could be generated. After pressing Enter, you will be prompted with a question, "Enter file in which to save the key". Simply press Enter or Enter the file name. If you do not enter any file name, id_rsa would be your filename. Later it asks for passphrase. Go ahead and set Passphrase if you want, otherwise you can just leave it blank and press Enter.
Now it's time to create a remote repository in GitHub. Follow the below steps.
1) On the top right corner you will see plus (+) located before the Settings. If you click on that, it will show an option to create a New Repository.
2) Enter the Repository name and select the option Initialize this repository with a README at the bottom of the page
3) Click on Create Repository button
4) GitHub creates a Repository for you.
5) You can view your existing repositories under Settings (located on Top right corner) -> Repositories
Now you have created a new remote repository. Now let's see how to create a folder and add files to the folder.
This is going to download the entire history of the project, all of the commits that have been made to the SpringCloud repo. You can run git log command to see the commits that have been made to the project. To see more condensed version, run git log --oneline. you can see commit per line.
First add the files to the staging area by running the command git add [file name]
Second run the command git commit -m "your commit message". It actually commits all the changes to the local repository
Third, push the changes to the remote repository. We can simply run command git push inorder to push the changes to remote repo but it will ask for GitHub login. Instead of that we can follow the below steps to make it easy.
1) Copy the ssh version of the GitHub repo url and run the command
git remote add origin git@github.com:MalathiBoggavarapu/SpringCloud.git
origin points to the remote destination, that is remote GitHub repo.
2) Now run the command git push origin master. It will push all your local changes to the remote repository. origin points to the remote repo and master is your local repo.
Note: Please follow my post "Git Fundamentals" and learn more about how to set remote destination for the local repository and also there is lot of stuff to be learnt about Git commands and its configuration.
So now we are done. Go and check your GitHub remote repository and see whether all the changes are committed over there.
You can search for my project using MalathiBoggavarapu/SpringCloud in the search bar of your GitHub account and Exercise this tutorial.
Hope this tutorial helps. Please comment if you have any questions.
Happy Learning!!
Prerequisites
Git - Latest version
First and foremost we should create a GitHub account. Please do visit github.com and create an account. Later we need to create an SSH key and add it to your GitHub account.
Generating a new SSH key
SSH key is used to identify yourself with the GitHub server using public key cryptography. We can generate SSH key in many ways. There are many open source tools to do that but we do it using Git Bash. So inorder to generate SSH key, first go ahead and download latest version of Git and install it. While installing make sure that you choose the option Git Bash. I am not going into the details about the configuration of Git during installation. To know more about how to configure Git during installation and several different concepts of Git, you can visit my post called "Git Fundamentals".Now go to the ..\Git\bin\, and click on bash. Git bash will be opened. Now we follow few steps to generate SSH key. See the below picture
ssh-keygen -t rsa -b 4096 -C "[Your registered Git email id]"
Using the above command a new SSH key could be generated. After pressing Enter, you will be prompted with a question, "Enter file in which to save the key". Simply press Enter or Enter the file name. If you do not enter any file name, id_rsa would be your filename. Later it asks for passphrase. Go ahead and set Passphrase if you want, otherwise you can just leave it blank and press Enter.
Adding the SSH key to the ssh-agent
First we should make sure that ssh-agent is running. Use the command below
eval $(ssh-agent -s)
Later add the SSH private key to the ssh-agent. If you created a key with different file name or you are having an existing ssh key with a different name, replace id_rsa in the below command with the name of the private key file.
$ ssh-add ~/.ssh/id_rsa
Adding SSH Key to GitHub account
Open the id_rsa.pub file in your text editor and copy the content. Now go to GitHub Settings -> SSH and GPG keys -> New SSH key. Add the copied SSH key and you are done. Now you should get authenticated in GitHub using that newly created SSH key and able to access, create repositories or whatsoever you could do.
Inorder to get authenticated use the below command. As an indication, SSH key should be turned to Green color in GitHub.
ssh -T git@github.com
Setting up your Remote Repository
1) On the top right corner you will see plus (+) located before the Settings. If you click on that, it will show an option to create a New Repository.
2) Enter the Repository name and select the option Initialize this repository with a README at the bottom of the page
3) Click on Create Repository button
4) GitHub creates a Repository for you.
5) You can view your existing repositories under Settings (located on Top right corner) -> Repositories
Now you have created a new remote repository. Now let's see how to create a folder and add files to the folder.
Create a Folder in GitHub
Follow the below steps to create a folder inside a repository.
1) Click on Create new file button
2) For instance if your folder name is Client, then type Client/
3) Later it asks for the file to be created. Create a README.md file and add some contents and down to the bottom of the page, you will see Commit new file button. Click on it, now your new folder Client should be created which contains README.md file within it.
4) Similarly you can create as many folders as you want.
Delete a Folder in GitHub
You can also delete a folder in GitHub. But we can not delete a folder directly when it contain files within. Once we delete all the files in the folder, the folder will be deleted automatically.
Try it and post your comments below if you are facing any problems.
Try it and post your comments below if you are facing any problems.
Upload files in GitHub
You have seen how to create Folder in GitHub. Now its time to upload some files into it. Follows the steps to do it.
1) Click on Upload files button. The below picture should be shown.
2) Drag the files from your computer and drop here.
3) Down to the bottom of the page, click on Commit changes.
4) All the uploaded files will be committed to the repository inside the desired folder. In our example it is Client folder
5) You can create as many folders (or applications) as you want and simply drag and drop the files and commit the changes to the repository.
This entire process immediatly sets up your remote repository for your project.Because of some bad reasons, if you want to delete the existing repository, go to the settings of the repository. Note, these Settings are not your Account Settings, they are your repository Settings. See the below picture.
Down to the bottom of the page under Danger Zone, you will find the option to delete the repository.
Now we are done creating Remote repository for our project. Now let's take a look at how to clone the remote repository to your local machine.
Cloning Remote repository to local machine
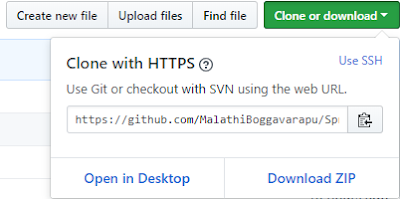
Go to your GitHub remote repository, and copy the https url of your project. See the below picture.
Copy the url and run the following command.
git clone https://github.com/MalathiBoggavarapu/SpringCloud.git

Copy the url and run the following command.
git clone https://github.com/MalathiBoggavarapu/SpringCloud.git

This is going to download the entire history of the project, all of the commits that have been made to the SpringCloud repo. You can run git log command to see the commits that have been made to the project. To see more condensed version, run git log --oneline. you can see commit per line.
Committing Local Repo Changes to Remote Repo
Now let's look at how to commit changes from local repository to remote repo. In our SpringCloud project, i added two new files ClientController and ServiceController and also did some changes to the existing files.First add the files to the staging area by running the command git add [file name]
Second run the command git commit -m "your commit message". It actually commits all the changes to the local repository
Third, push the changes to the remote repository. We can simply run command git push inorder to push the changes to remote repo but it will ask for GitHub login. Instead of that we can follow the below steps to make it easy.
1) Copy the ssh version of the GitHub repo url and run the command
git remote add origin git@github.com:MalathiBoggavarapu/SpringCloud.git
origin points to the remote destination, that is remote GitHub repo.
2) Now run the command git push origin master. It will push all your local changes to the remote repository. origin points to the remote repo and master is your local repo.
Note: Please follow my post "Git Fundamentals" and learn more about how to set remote destination for the local repository and also there is lot of stuff to be learnt about Git commands and its configuration.
So now we are done. Go and check your GitHub remote repository and see whether all the changes are committed over there.
You can search for my project using MalathiBoggavarapu/SpringCloud in the search bar of your GitHub account and Exercise this tutorial.
Hope this tutorial helps. Please comment if you have any questions.
Happy Learning!!


Comments
Post a Comment